Step-by-step Guide to Assembling Drum Brakes for Optimal Performance and Safety in Vehicles
Assembling Drum Brakes A Comprehensive Guide
Drum brakes are an essential component of many vehicles, providing reliable stopping power through a simple yet effective design. Understanding how to assemble drum brakes is crucial for anyone involved in automotive repair or restoration. This article will provide a detailed overview of the assembly process, emphasizing the key components, tools, and steps required for a successful installation.
Key Components of Drum Brakes
Before diving into the assembly process, it’s important to familiarize yourself with the main components of drum brakes
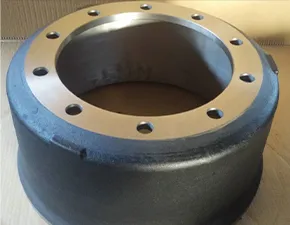
1. Brake Drum A cylindrical component mounted on the wheel hub, it rotates with the wheel and is the surface against which the brake shoes press when slowing down. 2. Brake Shoes Curved components that press against the inner surface of the brake drum to create friction and slow the vehicle. They are typically lined with a friction material. 3. Wheel Cylinder This hydraulic component activates the brake shoes by pushing them outward when brake fluid is applied. 4. Return Springs Springs that pull the brake shoes back to their original position when the brake is released. 5. Adjuster Mechanism A device that maintains the proper distance between the brake shoes and the drum, ensuring optimal performance over time.
Tools Needed for Assembly
To assemble drum brakes effectively, you will need the following tools
- Socket and wrench set - Screwdrivers (flat and Phillips) - Pliers - Brake spring tool (optional but highly recommended) - Cleaning supplies (brake cleaner, cloths) - Safety equipment (gloves and goggles)
Step-by-Step Assembly Process
1. Preparation Begin by ensuring that the vehicle is safely lifted and supported using jack stands. Remove the wheel to access the brake assembly easily.
assembling drum brakes

2. Inspect Components Before assembly, inspect all components for wear or damage. Replace any defective parts such as brake shoes, springs, and the wheel cylinder.
3. Clean the Area Use brake cleaner to remove any dust and debris from the brake drum and assembly area. This helps prevent contamination that could affect brake performance.
4. Install the Wheel Cylinder Position the new wheel cylinder inside the backing plate. Secure it in place using the appropriate bolts, ensuring it's oriented properly for effective operation.
5. Attach Brake Shoes Position the brake shoes onto the backing plate, aligning them with the wheel cylinder. Ensure that the shoes are placed correctly, with the lining facing inward toward the drum.
6. Install the Return Springs Using a brake spring tool or pliers, attach the return springs to the brake shoes. These springs are essential for returning the shoes to their resting position after brake application.
7. Connect the Adjuster Mechanism Install the adjuster mechanism between the two brake shoes. This component plays a vital role in maintaining the correct distance between the shoes and the drum, automatically adjusting as the shoes wear down.
8. Attach the Brake Drum Once all components are installed and secured, slide the brake drum over the shoes. It should fit snugly but allow for slight movement. Spin the drum to ensure there is no drag against the brake shoes.
9. Final Adjustments and Test After reattaching the wheel, lower the vehicle and pump the brakes a few times to set everything in place. Test drive at low speeds to ensure proper operation and listen for any unusual noises.
Conclusion
Assembling drum brakes may seem daunting at first, but with the right tools and understanding of the process, it can be accomplished with relative ease. Proper assembly is crucial for effective braking performance, ensuring safety for all vehicle occupants. Whether you’re a seasoned mechanic or a DIY enthusiast, mastering drum brake assembly will enhance your automotive skills and contribute to the overall longevity of your vehicle's braking system.
-
Brake Drums for Trucks | OEM-Grade, Factory DirectNewsNov.10,2025
-
High-Performance Brake Drums for Trucks | OEM & ISONewsNov.10,2025
-
Brake Drums Built to Last — OEM-Grade, Balanced for TrucksNewsNov.10,2025
-
Brake Drums for Trucks – OEM-Grade, Durable, Low NoiseNewsNov.10,2025
-
Brake Drums for Trucks | OEM, ISO-Certified, Fast DeliveryNewsNov.10,2025
-
Brake Drums: OEM-Grade, Precision Balanced, Factory DirectNewsNov.03,2025
-
Brake Drums: Heavy-Duty, OEM-Grade, Precision-BalancedNewsNov.03,2025


