-
 Afrikaans
 -
 Albanian
 -
 Amharic
 -
 Arabic
 -
 Armenian
 -
 Azerbaijani
 -
 Basque
 -
 Belarusian
 -
 Bengali
 -
 Bosnian
 -
 Bulgarian
 -
 Catalan
 -
 Cebuano
 -
 Corsican
 -
 Croatian
 -
 Czech
Czech -
 Danish
 -
 Dutch
Dutch -
 English
 -
 Esperanto
 -
 Estonian
 -
 Finnish
 -
 French
 -
 Frisian
 -
 Galician
 -
 Georgian
 -
 German
 -
 Greek
Greek -
 Gujarati
 -
 Haitian Creole
 -
 hausa
hausa -
 hawaiian
 -
 Hebrew
 -
 Hindi
Hindi -
 Miao
Miao -
 Hungarian
 -
 Icelandic
 -
 igbo
igbo -
 Indonesian
 -
 irish
irish -
 Italian
 -
 Japanese
 -
 Javanese
 -
 Kannada
 -
 kazakh
 -
 Khmer
Khmer -
 Rwandese
 -
 Korean
 -
 Kurdish
 -
 Kyrgyz
 -
 Lao
Lao -
 Latin
Latin -
 Latvian
 -
 Lithuanian
 -
 Luxembourgish
 -
 Macedonian
 -
 Malgashi
 -
 Malay
Malay -
 Malayalam
 -
 Maltese
 -
 Maori
Maori -
 Marathi
 -
 Mongolian
 -
 Myanmar
 -
 Nepali
 -
 Norwegian
 -
 Norwegian
 -
 Occitan
 -
 Pashto
 -
 Persian
 -
 Polish
 -
 Portuguese
 -
 Punjabi
 -
 Romanian
 -
 Russian
 -
 Samoan
 -
 Scottish Gaelic
 -
 Serbian
 -
 Sesotho
 -
 Shona
Shona -
 Sindhi
 -
 Sinhala
 -
 Slovak
 -
 Slovenian
 -
 Somali
 -
 Spanish
 -
 Sundanese
 -
 Swahili
 -
 Swedish
 -
 Tagalog
 -
 Tajik
Tajik -
 Tamil
Tamil -
 Tatar
Tatar -
 Telugu
 -
 Thai
Thai -
 Turkish
 -
 Turkmen
 -
 Ukrainian
 -
 Urdu
Urdu -
 Uighur
 -
 Uzbek
Uzbek -
 Vietnamese
 -
 Welsh
Welsh -
 Bantu
Bantu -
 Yiddish
 -
 Yoruba
 -
 Zulu
Zulu
drum brake cylinder replacement
Understanding Drum Brake Cylinder Replacement
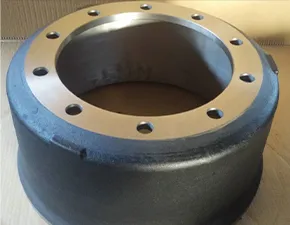
Drum brakes are a common braking system found in many vehicles, especially older models and those designed for lighter loads. They work by using a cylindrical drum that rotates with the wheel and brake shoes that press against the inside of the drum to create friction and slow down the vehicle. One of the crucial components in this system is the brake cylinder, which plays a vital role in hydraulic pressure for braking functionality. Over time, these cylinders can wear out or develop leaks, necessitating their replacement. This article will guide you through the process of replacing a drum brake cylinder and highlight some important considerations.
Signs of a Failing Brake Cylinder
Before diving into replacement, it's essential to recognize the signs of a failing drum brake cylinder. Common indicators include
1. Brake Fluid Leaks If you notice brake fluid pooling under your vehicle or around the wheel area, it could signify a leak in the brake cylinder. 2. Reduced Braking Performance A noticeable decrease in braking effectiveness, such as needing more pressure on the pedal or a spongy feel, can indicate cylinder issues.
3. Uneven Wear on Brake Shoes If the brake shoes are unevenly worn or if you hear unusual noises while braking, it may point to a malfunctioning cylinder.
4. Warning Lights In modern vehicles, dashboard warning lights related to the brake system can signal a problem requiring attention.
Tools and Materials Needed
Before starting the replacement process, gather the necessary tools and materials
- New brake cylinder - Brake fluid - Wrench set - Screwdrivers - Brake cleaner - Rags - Jack and jack stands - Safety goggles and gloves
The Replacement Process
1. Safety First Engage your parking brake and wear safety gear. Ensure the vehicle is on a flat surface.
drum brake cylinder replacement

2. Lift the Vehicle Use a jack to lift the vehicle and secure it with jack stands.
3. Remove the Wheel Take off the lug nuts and remove the wheel to access the drum brake assembly.
4. Remove the Brake Drum Depending on your vehicle, you may need to unscrew some retaining screws or use a puller to remove the brake drum.
5. Disconnect the Old Cylinder Locate the brake cylinder, disconnect the brake line, and remove any retaining bolts. Be cautious to avoid damaging the line.
6. Install the New Cylinder Position the new brake cylinder in place and secure it with the necessary bolts. Reconnect the brake line, ensuring it is tight to prevent leaks.
7. Reassemble the Drum Brake Place the brake drum back onto the assembly and reattach the wheel.
8. Refill Brake Fluid Open the hood and check the brake fluid reservoir. Add new brake fluid if necessary, following the manufacturer’s specifications.
9. Test the Brakes Before driving, pump the brake pedal a few times to ensure proper hydraulic pressure. This action helps to settle the new cylinder.
10. Test Drive Carefully take the vehicle for a test drive, monitoring the braking performance and ensuring everything functions well.
Conclusion
Replacing a drum brake cylinder is a manageable task for those with basic mechanical skills and the right tools. Regular maintenance checks can help catch issues before they necessitate more significant repairs. If you feel uncomfortable undertaking this task, it is always advisable to consult a professional mechanic. Maintaining your braking system is crucial for your safety and the safety of others on the road.
-
What Are Drum BrakesNewsJul.07,2025
-
Understanding Brake Drum MaterialNewsJul.07,2025
-
Semi-Trailer Brake Drum: A Key Component for Extreme Loads and Long-Distance TransportNewsJul.07,2025
-
Drum Brake Pads for SaleNewsJul.07,2025
-
Brake Drums for SaleNewsJul.07,2025
-
Brake Drum ManufacturerNewsJul.07,2025
-
Aluminum Brake Drums: The Future of High-Performance CarsNewsJul.07,2025
