-
 Afrikaans
 -
 Albanian
 -
 Amharic
 -
 Arabic
 -
 Armenian
 -
 Azerbaijani
 -
 Basque
 -
 Belarusian
 -
 Bengali
 -
 Bosnian
 -
 Bulgarian
 -
 Catalan
 -
 Cebuano
 -
 Corsican
 -
 Croatian
 -
 Czech
Czech -
 Danish
 -
 Dutch
Dutch -
 English
 -
 Esperanto
 -
 Estonian
 -
 Finnish
 -
 French
 -
 Frisian
 -
 Galician
 -
 Georgian
 -
 German
 -
 Greek
Greek -
 Gujarati
 -
 Haitian Creole
 -
 hausa
hausa -
 hawaiian
 -
 Hebrew
 -
 Hindi
Hindi -
 Miao
Miao -
 Hungarian
 -
 Icelandic
 -
 igbo
igbo -
 Indonesian
 -
 irish
irish -
 Italian
 -
 Japanese
 -
 Javanese
 -
 Kannada
 -
 kazakh
 -
 Khmer
Khmer -
 Rwandese
 -
 Korean
 -
 Kurdish
 -
 Kyrgyz
 -
 Lao
Lao -
 Latin
Latin -
 Latvian
 -
 Lithuanian
 -
 Luxembourgish
 -
 Macedonian
 -
 Malgashi
 -
 Malay
Malay -
 Malayalam
 -
 Maltese
 -
 Maori
Maori -
 Marathi
 -
 Mongolian
 -
 Myanmar
 -
 Nepali
 -
 Norwegian
 -
 Norwegian
 -
 Occitan
 -
 Pashto
 -
 Persian
 -
 Polish
 -
 Portuguese
 -
 Punjabi
 -
 Romanian
 -
 Russian
 -
 Samoan
 -
 Scottish Gaelic
 -
 Serbian
 -
 Sesotho
 -
 Shona
Shona -
 Sindhi
 -
 Sinhala
 -
 Slovak
 -
 Slovenian
 -
 Somali
 -
 Spanish
 -
 Sundanese
 -
 Swahili
 -
 Swedish
 -
 Tagalog
 -
 Tajik
Tajik -
 Tamil
Tamil -
 Tatar
Tatar -
 Telugu
 -
 Thai
Thai -
 Turkish
 -
 Turkmen
 -
 Ukrainian
 -
 Urdu
Urdu -
 Uighur
 -
 Uzbek
Uzbek -
 Vietnamese
 -
 Welsh
Welsh -
 Bantu
Bantu -
 Yiddish
 -
 Yoruba
 -
 Zulu
Zulu
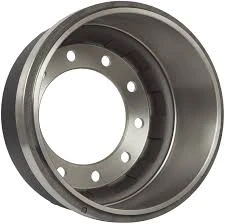
drum brake removal
Drum Brake Removal A Step-by-Step Guide
Removing drum brakes can seem daunting, but with the right tools and a bit of patience, it’s a task that most DIY enthusiasts can accomplish. Drum brakes are commonly used in older vehicles and some rear-end systems of modern cars. Here’s a comprehensive guide on how to remove drum brakes safely and effectively.
Tools and Materials Needed
Before you start, gather the necessary tools - Jack and jack stands - Lug wrench - Screwdriver (flathead) - Brake cleaner - C-clamp or brake spreader tool - Safety glasses - Gloves - Torque wrench - Replacement parts (if needed)
Step 1 Safety First
Start by parking your vehicle on a flat surface and engaging the parking brake. Ensure wear safety glasses and gloves to protect yourself from debris and sharp edges during the process.
Step 2 Loosen the Lug Nuts
Using a lug wrench, loosen the lug nuts on the wheel you’re working on without removing them completely. This step is easier while the tire is still on the ground.
Step 3 Lift the Vehicle
Using a jack, lift the vehicle off the ground. Secure it with jack stands to prevent any accidents. Once the vehicle is stable, remove the lug nuts and take off the wheel to expose the drum brake system.
Step 4 Removing the Drum
Before removing the drum, inspect the assembly. Sometimes, the drum can be stuck due to wear or corrosion. Use a flathead screwdriver to gently pry between the drum and the backing plate, being careful not to damage any components. If necessary, you can tap the drum gently with a hammer to loosen it.
drum brake removal

Once the drum is free, slide it off the wheel hub. This may require some force if it has been on for a long time.
Step 5 Inspect the Brake Assembly
With the drum removed, inspect the brake shoes, springs, and other associated hardware. Look for wear and tear or any components that might need replacement. Take pictures to help reassemble parts correctly.
Step 6 Remove Brake Shoes (if necessary)
If you're replacing the brake shoes, use a C-clamp to compress the brake shoes together. Carefully detach the springs and the retaining clips with a screwdriver or pliers. Note how everything is arranged for a smooth reinstallation.
Step 7 Clean and Prepare
Before reassembling, clean the drum, backing plate, and other components with brake cleaner. This removes dust and debris, ensuring optimal performance.
Step 8 Reassemble
Follow the reverse order of disassembly to reinstall the drum brakes. Make sure all components are securely fastened and torqued to the manufacturer’s specifications.
Conclusion
Removing and replacing drum brakes is a straightforward process with attention to safety and detail. Regular inspection and maintenance of your brake system will help ensure the longevity of your vehicle’s braking performance. Always consult your vehicle’s service manual for specific instructions tailored to your model. Happy repairing!
-
What Are Drum BrakesNewsJul.07,2025
-
Understanding Brake Drum MaterialNewsJul.07,2025
-
Semi-Trailer Brake Drum: A Key Component for Extreme Loads and Long-Distance TransportNewsJul.07,2025
-
Drum Brake Pads for SaleNewsJul.07,2025
-
Brake Drums for SaleNewsJul.07,2025
-
Brake Drum ManufacturerNewsJul.07,2025
-
Aluminum Brake Drums: The Future of High-Performance CarsNewsJul.07,2025
