
-
 Afrikaans
 -
 Albanian
 -
 Amharic
 -
 Arabic
 -
 Armenian
 -
 Azerbaijani
 -
 Basque
 -
 Belarusian
 -
 Bengali
 -
 Bosnian
 -
 Bulgarian
 -
 Catalan
 -
 Cebuano
 -
 Corsican
 -
 Croatian
 -
 Czech
Czech -
 Danish
 -
 Dutch
Dutch -
 English
 -
 Esperanto
 -
 Estonian
 -
 Finnish
 -
 French
 -
 Frisian
 -
 Galician
 -
 Georgian
 -
 German
 -
 Greek
Greek -
 Gujarati
 -
 Haitian Creole
 -
 hausa
hausa -
 hawaiian
 -
 Hebrew
 -
 Hindi
Hindi -
 Miao
Miao -
 Hungarian
 -
 Icelandic
 -
 igbo
igbo -
 Indonesian
 -
 irish
irish -
 Italian
 -
 Japanese
 -
 Javanese
 -
 Kannada
 -
 kazakh
 -
 Khmer
Khmer -
 Rwandese
 -
 Korean
 -
 Kurdish
 -
 Kyrgyz
 -
 Lao
Lao -
 Latin
Latin -
 Latvian
 -
 Lithuanian
 -
 Luxembourgish
 -
 Macedonian
 -
 Malgashi
 -
 Malay
Malay -
 Malayalam
 -
 Maltese
 -
 Maori
Maori -
 Marathi
 -
 Mongolian
 -
 Myanmar
 -
 Nepali
 -
 Norwegian
 -
 Norwegian
 -
 Occitan
 -
 Pashto
 -
 Persian
 -
 Polish
 -
 Portuguese
 -
 Punjabi
 -
 Romanian
 -
 Russian
 -
 Samoan
 -
 Scottish Gaelic
 -
 Serbian
 -
 Sesotho
 -
 Shona
Shona -
 Sindhi
 -
 Sinhala
 -
 Slovak
 -
 Slovenian
 -
 Somali
 -
 Spanish
 -
 Sundanese
 -
 Swahili
 -
 Swedish
 -
 Tagalog
 -
 Tajik
Tajik -
 Tamil
Tamil -
 Tatar
Tatar -
 Telugu
 -
 Thai
Thai -
 Turkish
 -
 Turkmen
 -
 Ukrainian
 -
 Urdu
Urdu -
 Uighur
 -
 Uzbek
Uzbek -
 Vietnamese
 -
 Welsh
Welsh -
 Bantu
Bantu -
 Yiddish
 -
 Yoruba
 -
 Zulu
Zulu

Feb . 13, 2025 02:49
Back to list
drum brake self adjuster installation
Understanding the intricacies of installing a drum brake self-adjuster can seem daunting, even for seasoned mechanics. But with the right guidance, this essential component of your braking system can be fitted seamlessly, ensuring optimal performance and safety. This comprehensive article offers a step-by-step approach to the drum brake self-adjuster installation, underpinned by expert insights and real-world experiences.
Installation of the Self-Adjuster - Position the Adjuster Screw Slide the adjuster screw assembly in-between the brake shoes. Ensure the threads are clean and lubricated to allow smooth movement. Proper placement is key to ensuring the adjuster performs its function effectively. - Secure the Adjuster Lever Place the adjuster lever in its designated position, ensuring it aligns perfectly with the adjuster screw. Most levers have a specific footprint or marking to guide correct placement. - Attach the Spring The spring is pivotal in engaging the adjuster lever with the screw. Connect the spring ends to the appropriate hooks, ensuring it is tensioned correctly. Improper spring installation can lead to malfunctioning of the self-adjuster. Reassembly Reassemble the brake components in the reverse order of disassembly. Use your pre-disassembly photographs as a guide. Pay special attention to the correct seating of the brake shoes against the backing plate and the alignment of the hold-down springs. Adjustment Once installed, manually adjust the brake shoes using a brake spoon or adjuster tool through the adjustment slot in the backing plate. Rotate the adjuster screw until the shoes lightly contact the drum, then back off slightly to ensure free rotation. This initial setup ensures that the self-adjuster has the correct baseline from which to operate. Testing Carefully lower the vehicle and perform a driving test in a safe environment. Gradually apply the brakes to assess their responsiveness. Listen for any unusual noises and check for uneven braking, indicating possible misalignment or component failure. Expert Insights and Maintenance Drum brake self-adjusters operate under significant stress and environmental conditions. Regular inspection and maintenance are crucial in prolonging their lifespan. Experienced mechanics recommend checking the adjuster mechanism during routine brake services. Always ensure that the adjuster components are free from rust and debris and that the adjuster screw threads are well-lubricated to prevent binding. The drum brake self-adjuster is a marvel of mechanical engineering, efficiently compensating for brake wear and maintaining vehicle safety when installed correctly. By following the outlined steps with precision and care, and by fostering a habit of regular inspection, drivers and mechanics alike can ensure their vehicles remain safe and reliable on the road. This commitment to excellence not only enhances performance but builds trust in the longevity and dependability of drum brake systems.
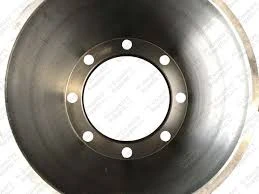

Installation of the Self-Adjuster - Position the Adjuster Screw Slide the adjuster screw assembly in-between the brake shoes. Ensure the threads are clean and lubricated to allow smooth movement. Proper placement is key to ensuring the adjuster performs its function effectively. - Secure the Adjuster Lever Place the adjuster lever in its designated position, ensuring it aligns perfectly with the adjuster screw. Most levers have a specific footprint or marking to guide correct placement. - Attach the Spring The spring is pivotal in engaging the adjuster lever with the screw. Connect the spring ends to the appropriate hooks, ensuring it is tensioned correctly. Improper spring installation can lead to malfunctioning of the self-adjuster. Reassembly Reassemble the brake components in the reverse order of disassembly. Use your pre-disassembly photographs as a guide. Pay special attention to the correct seating of the brake shoes against the backing plate and the alignment of the hold-down springs. Adjustment Once installed, manually adjust the brake shoes using a brake spoon or adjuster tool through the adjustment slot in the backing plate. Rotate the adjuster screw until the shoes lightly contact the drum, then back off slightly to ensure free rotation. This initial setup ensures that the self-adjuster has the correct baseline from which to operate. Testing Carefully lower the vehicle and perform a driving test in a safe environment. Gradually apply the brakes to assess their responsiveness. Listen for any unusual noises and check for uneven braking, indicating possible misalignment or component failure. Expert Insights and Maintenance Drum brake self-adjusters operate under significant stress and environmental conditions. Regular inspection and maintenance are crucial in prolonging their lifespan. Experienced mechanics recommend checking the adjuster mechanism during routine brake services. Always ensure that the adjuster components are free from rust and debris and that the adjuster screw threads are well-lubricated to prevent binding. The drum brake self-adjuster is a marvel of mechanical engineering, efficiently compensating for brake wear and maintaining vehicle safety when installed correctly. By following the outlined steps with precision and care, and by fostering a habit of regular inspection, drivers and mechanics alike can ensure their vehicles remain safe and reliable on the road. This commitment to excellence not only enhances performance but builds trust in the longevity and dependability of drum brake systems.
Latest news
-
Rear Drum Brakes Maintenance TipsNewsAug.04,2025
-
Key Components Affecting Brake Drum FunctionNewsAug.04,2025
-
Important Inspection for Truck Drum BrakeNewsAug.04,2025
-
How to Prepare for Changing Rear Drum BrakesNewsAug.04,2025
-
Essential Tools for Cleaning Drum Brakes ProperlyNewsAug.04,2025
-
Brake Drum Function GuideNewsAug.04,2025
-
Safety Features of Red Brake DrumsNewsAug.01,2025