-
 Afrikaans
 -
 Albanian
 -
 Amharic
 -
 Arabic
 -
 Armenian
 -
 Azerbaijani
 -
 Basque
 -
 Belarusian
 -
 Bengali
 -
 Bosnian
 -
 Bulgarian
 -
 Catalan
 -
 Cebuano
 -
 Corsican
 -
 Croatian
 -
 Czech
Czech -
 Danish
 -
 Dutch
Dutch -
 English
 -
 Esperanto
 -
 Estonian
 -
 Finnish
 -
 French
 -
 Frisian
 -
 Galician
 -
 Georgian
 -
 German
 -
 Greek
Greek -
 Gujarati
 -
 Haitian Creole
 -
 hausa
hausa -
 hawaiian
 -
 Hebrew
 -
 Hindi
Hindi -
 Miao
Miao -
 Hungarian
 -
 Icelandic
 -
 igbo
igbo -
 Indonesian
 -
 irish
irish -
 Italian
 -
 Japanese
 -
 Javanese
 -
 Kannada
 -
 kazakh
 -
 Khmer
Khmer -
 Rwandese
 -
 Korean
 -
 Kurdish
 -
 Kyrgyz
 -
 Lao
Lao -
 Latin
Latin -
 Latvian
 -
 Lithuanian
 -
 Luxembourgish
 -
 Macedonian
 -
 Malgashi
 -
 Malay
Malay -
 Malayalam
 -
 Maltese
 -
 Maori
Maori -
 Marathi
 -
 Mongolian
 -
 Myanmar
 -
 Nepali
 -
 Norwegian
 -
 Norwegian
 -
 Occitan
 -
 Pashto
 -
 Persian
 -
 Polish
 -
 Portuguese
 -
 Punjabi
 -
 Romanian
 -
 Russian
 -
 Samoan
 -
 Scottish Gaelic
 -
 Serbian
 -
 Sesotho
 -
 Shona
Shona -
 Sindhi
 -
 Sinhala
 -
 Slovak
 -
 Slovenian
 -
 Somali
 -
 Spanish
 -
 Sundanese
 -
 Swahili
 -
 Swedish
 -
 Tagalog
 -
 Tajik
Tajik -
 Tamil
Tamil -
 Tatar
Tatar -
 Telugu
 -
 Thai
Thai -
 Turkish
 -
 Turkmen
 -
 Ukrainian
 -
 Urdu
Urdu -
 Uighur
 -
 Uzbek
Uzbek -
 Vietnamese
 -
 Welsh
Welsh -
 Bantu
Bantu -
 Yiddish
 -
 Yoruba
 -
 Zulu
Zulu
drum brake wheel cylinder replacement
Drum Brake Wheel Cylinder Replacement A Comprehensive Guide
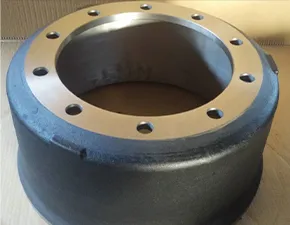
When it comes to vehicle safety and performance, properly functioning brakes are paramount. One essential component of the drum brake system is the wheel cylinder, which plays a crucial role in applying the braking force. Over time, the wheel cylinder can wear out or develop leaks, necessitating a replacement. In this article, we’ll guide you through the process of replacing a drum brake wheel cylinder, ensuring that your vehicle’s braking system remains effective.
Tools and Materials Needed
Before you begin the replacement, gather the necessary tools and materials. You will need
- A jack and jack stands - A lug wrench - A brake line wrench - A socket set - A brake cleaner - New wheel cylinders - Replacement brake shoes (recommended) - Brake fluid - Gloves and safety goggles
Step 1 Prepare Your Vehicle
Start by ensuring your vehicle is parked on a flat surface. Engage the parking brake and loosen the lug nuts on the rear wheels slightly while the vehicle is still on the ground. Then, raise the vehicle using the jack and secure it with jack stands. Remove the rear wheels to access the drum brake components.
Step 2 Remove the Brake Drum
With the wheels off, you can now remove the brake drum. In some cases, the drum may be stuck due to rust or debris. If this happens, tap around the edges with a hammer to loosen it. Once free, slide the drum off to expose the brake shoes and cylinder.
Step 3 Inspect the Brake Assembly
Before proceeding to replace the wheel cylinder, inspect the brake assembly for any further damage. Look at the brake shoes, springs, and other components for wear. It's a good idea to replace the brake shoes at the same time if they show signs of deterioration, as this can improve braking performance.
drum brake wheel cylinder replacement

Step 4 Disconnect the Old Wheel Cylinder
Locate the wheel cylinder, which is typically positioned at the bottom of the brake assembly. Use a brake line wrench to carefully disconnect the brake line from the cylinder, being cautious to avoid damaging the line. Next, remove any mounting bolts and detach the cylinder from the backing plate. Be prepared for some brake fluid to leak out, so have a rag handy to clean up any spills.
Step 5 Install the New Wheel Cylinder
Take your new wheel cylinder and position it in place. Secure it to the backing plate with the mounting bolts, ensuring it's tightened to the manufacturer’s specifications. Reconnect the brake line, making sure it is threaded smoothly and securely. Again, use the brake line wrench to avoid damaging the line.
Step 6 Reassemble the Brake Components
Before reassembling everything, apply a light coat of brake grease to the contact points of the brake shoes to reduce friction. Reattach the brake shoes and springs, ensuring everything is aligned correctly. Once satisfied, slide the brake drum back into place.
Step 7 Test and Refill Brake Fluid
Finally, before putting the wheels back on, you’ll want to check your brake fluid levels. Add fluid if necessary, and then pump the brake pedal to ensure the pads are seated correctly. Once satisfied, reattach the wheels and lower the vehicle back to the ground.
Conclusion
Replacing a drum brake wheel cylinder may seem daunting, but with the right tools and a methodical approach, it can be completed successfully. Regular maintenance of your braking system is crucial for vehicle safety, and ensuring your wheel cylinders are in good condition is a vital part of that. If at any point you feel unsure, don’t hesitate to consult a professional mechanic. Safe driving!
-
What Are Drum BrakesNewsJul.07,2025
-
Understanding Brake Drum MaterialNewsJul.07,2025
-
Semi-Trailer Brake Drum: A Key Component for Extreme Loads and Long-Distance TransportNewsJul.07,2025
-
Drum Brake Pads for SaleNewsJul.07,2025
-
Brake Drums for SaleNewsJul.07,2025
-
Brake Drum ManufacturerNewsJul.07,2025
-
Aluminum Brake Drums: The Future of High-Performance CarsNewsJul.07,2025
