-
 Afrikaans
 -
 Albanian
 -
 Amharic
 -
 Arabic
 -
 Armenian
 -
 Azerbaijani
 -
 Basque
 -
 Belarusian
 -
 Bengali
 -
 Bosnian
 -
 Bulgarian
 -
 Catalan
 -
 Cebuano
 -
 Corsican
 -
 Croatian
 -
 Czech
Czech -
 Danish
 -
 Dutch
Dutch -
 English
 -
 Esperanto
 -
 Estonian
 -
 Finnish
 -
 French
 -
 Frisian
 -
 Galician
 -
 Georgian
 -
 German
 -
 Greek
Greek -
 Gujarati
 -
 Haitian Creole
 -
 hausa
hausa -
 hawaiian
 -
 Hebrew
 -
 Hindi
Hindi -
 Miao
Miao -
 Hungarian
 -
 Icelandic
 -
 igbo
igbo -
 Indonesian
 -
 irish
irish -
 Italian
 -
 Japanese
 -
 Javanese
 -
 Kannada
 -
 kazakh
 -
 Khmer
Khmer -
 Rwandese
 -
 Korean
 -
 Kurdish
 -
 Kyrgyz
 -
 Lao
Lao -
 Latin
Latin -
 Latvian
 -
 Lithuanian
 -
 Luxembourgish
 -
 Macedonian
 -
 Malgashi
 -
 Malay
Malay -
 Malayalam
 -
 Maltese
 -
 Maori
Maori -
 Marathi
 -
 Mongolian
 -
 Myanmar
 -
 Nepali
 -
 Norwegian
 -
 Norwegian
 -
 Occitan
 -
 Pashto
 -
 Persian
 -
 Polish
 -
 Portuguese
 -
 Punjabi
 -
 Romanian
 -
 Russian
 -
 Samoan
 -
 Scottish Gaelic
 -
 Serbian
 -
 Sesotho
 -
 Shona
Shona -
 Sindhi
 -
 Sinhala
 -
 Slovak
 -
 Slovenian
 -
 Somali
 -
 Spanish
 -
 Sundanese
 -
 Swahili
 -
 Swedish
 -
 Tagalog
 -
 Tajik
Tajik -
 Tamil
Tamil -
 Tatar
Tatar -
 Telugu
 -
 Thai
Thai -
 Turkish
 -
 Turkmen
 -
 Ukrainian
 -
 Urdu
Urdu -
 Uighur
 -
 Uzbek
Uzbek -
 Vietnamese
 -
 Welsh
Welsh -
 Bantu
Bantu -
 Yiddish
 -
 Yoruba
 -
 Zulu
Zulu
How to Release Rear Drum Brakes
How to Release Rear Drum Brakes
Rear drum brakes are a crucial component of many vehicles, providing the necessary stopping power for safe driving. However, there may be instances where you need to release them, whether for maintenance, repairs, or simply troubleshooting. Understanding how to properly release rear drum brakes will not only help you in these situations but also enhance your overall vehicle maintenance skills.
1. Understanding Drum Brakes
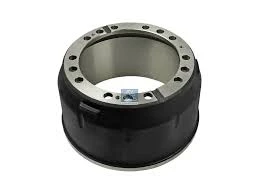
Before diving into the process of releasing rear drum brakes, it's essential to understand how they function. Unlike disc brakes that use calipers and rotors, drum brakes consist of a cylindrical drum and brake shoes that push outward against the inner surface of the drum when the brake pedal is pressed. This design can sometimes make them more challenging to service and release.
2. Required Tools and Materials
To release rear drum brakes safely, you will need a few essential tools - A jack and jack stands - A lug wrench - A brake adjustment tool or screwdriver - Safety goggles and gloves - A torque wrench (optional for reassembly)
3. Safety First
Safety is of utmost importance. Always work on a level surface and ensure that the vehicle is securely raised with jack stands. Never rely solely on the jack. Disconnecting the battery is also a good idea to prevent any electrical issues while working on the brakes.
Start by loosening the lug nuts on the rear wheel with the lug wrench. Do this while the car is still on the ground to prevent the wheel from spinning. Once loosened, lift the vehicle with the jack and secure it with jack stands. Now, remove the wheel to access the drum brake assembly.
how to release rear drum brakes

5. Inspect the Brake Components
With the wheel removed, examine the brake drum for any visible signs of wear or damage. If you notice any issues, it may be best to consult a professional. However, if everything looks normal, you can proceed with the next steps.
6. Adjusting the Brake Shoes
To release the rear drum brakes, you often need to adjust the brake shoes. Locate the adjustment slot on the drum brake backing plate. Using your brake adjustment tool or a flat screwdriver, turn the adjuster in the proper direction—typically counterclockwise to pull the shoes away from the drum. This adjustment will create enough clearance to remove the drum.
7. Removing the Brake Drum
With the brake shoes properly adjusted, you can now try to remove the brake drum. It may require a gentle tug or a hammer to break it free, especially if it's been on for a long time. If the drum doesn’t budge, double-check the adjustment of the brake shoes.
8. Reinstallation
After completing your maintenance or repairs, reinstalling the brake drum is straightforward. Adjust the shoes slightly if needed for a snug fit, then reattach the wheel and lug nuts. It’s essential to torque the lug nuts to the manufacturer’s specifications for safety.
Conclusion
Releasing rear drum brakes may seem daunting, but it is a manageable task with the right tools and understanding. By following these steps closely, you can ensure that your drum brakes are functioning correctly and safely. If at any point you feel unsure, do not hesitate to consult a professional mechanic. Regular maintenance is key to safe driving, and understanding your vehicle’s brake system is an essential part of responsible car ownership.
-
What Are Drum BrakesNewsJul.07,2025
-
Understanding Brake Drum MaterialNewsJul.07,2025
-
Semi-Trailer Brake Drum: A Key Component for Extreme Loads and Long-Distance TransportNewsJul.07,2025
-
Drum Brake Pads for SaleNewsJul.07,2025
-
Brake Drums for SaleNewsJul.07,2025
-
Brake Drum ManufacturerNewsJul.07,2025
-
Aluminum Brake Drums: The Future of High-Performance CarsNewsJul.07,2025
