-
 Afrikaans
 -
 Albanian
 -
 Amharic
 -
 Arabic
 -
 Armenian
 -
 Azerbaijani
 -
 Basque
 -
 Belarusian
 -
 Bengali
 -
 Bosnian
 -
 Bulgarian
 -
 Catalan
 -
 Cebuano
 -
 Corsican
 -
 Croatian
 -
 Czech
Czech -
 Danish
 -
 Dutch
Dutch -
 English
 -
 Esperanto
 -
 Estonian
 -
 Finnish
 -
 French
 -
 Frisian
 -
 Galician
 -
 Georgian
 -
 German
 -
 Greek
Greek -
 Gujarati
 -
 Haitian Creole
 -
 hausa
hausa -
 hawaiian
 -
 Hebrew
 -
 Hindi
Hindi -
 Miao
Miao -
 Hungarian
 -
 Icelandic
 -
 igbo
igbo -
 Indonesian
 -
 irish
irish -
 Italian
 -
 Japanese
 -
 Javanese
 -
 Kannada
 -
 kazakh
 -
 Khmer
Khmer -
 Rwandese
 -
 Korean
 -
 Kurdish
 -
 Kyrgyz
 -
 Lao
Lao -
 Latin
Latin -
 Latvian
 -
 Lithuanian
 -
 Luxembourgish
 -
 Macedonian
 -
 Malgashi
 -
 Malay
Malay -
 Malayalam
 -
 Maltese
 -
 Maori
Maori -
 Marathi
 -
 Mongolian
 -
 Myanmar
 -
 Nepali
 -
 Norwegian
 -
 Norwegian
 -
 Occitan
 -
 Pashto
 -
 Persian
 -
 Polish
 -
 Portuguese
 -
 Punjabi
 -
 Romanian
 -
 Russian
 -
 Samoan
 -
 Scottish Gaelic
 -
 Serbian
 -
 Sesotho
 -
 Shona
Shona -
 Sindhi
 -
 Sinhala
 -
 Slovak
 -
 Slovenian
 -
 Somali
 -
 Spanish
 -
 Sundanese
 -
 Swahili
 -
 Swedish
 -
 Tagalog
 -
 Tajik
Tajik -
 Tamil
Tamil -
 Tatar
Tatar -
 Telugu
 -
 Thai
Thai -
 Turkish
 -
 Turkmen
 -
 Ukrainian
 -
 Urdu
Urdu -
 Uighur
 -
 Uzbek
Uzbek -
 Vietnamese
 -
 Welsh
Welsh -
 Bantu
Bantu -
 Yiddish
 -
 Yoruba
 -
 Zulu
Zulu
how to adjust drum brakes on a car
How to Adjust Drum Brakes on a Car
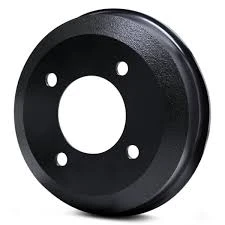
Drum brakes are a traditional type of braking system found in many older vehicles and some modern cars. Unlike disc brakes, drum brakes utilize a rotating drum and brake shoes to create friction and slow down the wheels. Over time, drum brakes can lose efficiency due to wear and tear, making periodic adjustments necessary to ensure optimal performance and safety. Here’s a comprehensive guide on how to adjust drum brakes on your car.
Tools Needed Before starting the adjustment process, gather the required tools 1. Jack and jack stands 2. Lug wrench 3. Brake adjustment tool or flathead screwdriver 4. Clean cloth and brake cleaner (optional) 5. Safety goggles and gloves
Step 1 Prepare the Vehicle Ensure your vehicle is parked on a flat surface. Engage the parking brake to prevent rolling. Loosen the lug nuts slightly on the rear wheels (if you're adjusting rear drum brakes) but do not remove them yet. Use the jack to lift the car and securely place it on jack stands. Once stable, completely remove the lug nuts and the wheels.
Step 2 Inspect the Drum Brakes Before making adjustments, inspect the brake components for wear and damage
. Look for signs of uneven wear on the brake shoes and check the brake drum’s surface for scoring or cracks. If any components are excessively worn, consider replacing them.how to adjust drum brakes on a car

Step 3 Locate the Adjuster With the drum removed, locate the adjuster mechanism. This is typically found at the bottom of the brake assembly and can be adjusted using a brake adjustment tool or a flathead screwdriver. The adjuster controls the distance between the brake shoes and the drum.
Step 4 Adjust the Brake Shoes To tighten the brakes, turn the adjuster wheel or screw, usually in a clockwise direction, until the brake shoes expand and contact the drum lightly. Be cautious not to over-adjust; the shoes should not bind against the drum. A good rule of thumb is to spin the drum manually—there should be some resistance but it should still turn freely.
Step 5 Test the Adjustment After making the adjustments, reassemble the drum and wheel. Don’t forget to replace the lug nuts and lower the car back to the ground. Once it’s secure, pump the brake pedal a few times to seat the brake shoes against the drum. This hopping action will help in getting the correct adjustment.
Step 6 Final Check Take the car for a slow test drive, applying the brakes gradually. Listen for any abnormal noises and feel for proper braking response. If the brakes feel uneven or the car pulls to one side, you may need to re-adjust the brakes.
Conclusion While adjusting drum brakes can be somewhat straightforward, it’s essential to proceed with caution. If you’re unsure or uncomfortable with any part of the process, don’t hesitate to consult a professional mechanic. Properly adjusted brakes are crucial for safe driving, ensuring your vehicle stops reliably when you need it to. Regular maintenance can help extend the life of your braking system and improve your overall driving safety.
-
Rear Drum Brakes Maintenance TipsNewsAug.04,2025
-
Key Components Affecting Brake Drum FunctionNewsAug.04,2025
-
Important Inspection for Truck Drum BrakeNewsAug.04,2025
-
How to Prepare for Changing Rear Drum BrakesNewsAug.04,2025
-
Essential Tools for Cleaning Drum Brakes ProperlyNewsAug.04,2025
-
Brake Drum Function GuideNewsAug.04,2025
-
Safety Features of Red Brake DrumsNewsAug.01,2025
