-
 Afrikaans
 -
 Albanian
 -
 Amharic
 -
 Arabic
 -
 Armenian
 -
 Azerbaijani
 -
 Basque
 -
 Belarusian
 -
 Bengali
 -
 Bosnian
 -
 Bulgarian
 -
 Catalan
 -
 Cebuano
 -
 Corsican
 -
 Croatian
 -
 Czech
Czech -
 Danish
 -
 Dutch
Dutch -
 English
 -
 Esperanto
 -
 Estonian
 -
 Finnish
 -
 French
 -
 Frisian
 -
 Galician
 -
 Georgian
 -
 German
 -
 Greek
Greek -
 Gujarati
 -
 Haitian Creole
 -
 hausa
hausa -
 hawaiian
 -
 Hebrew
 -
 Hindi
Hindi -
 Miao
Miao -
 Hungarian
 -
 Icelandic
 -
 igbo
igbo -
 Indonesian
 -
 irish
irish -
 Italian
 -
 Japanese
 -
 Javanese
 -
 Kannada
 -
 kazakh
 -
 Khmer
Khmer -
 Rwandese
 -
 Korean
 -
 Kurdish
 -
 Kyrgyz
 -
 Lao
Lao -
 Latin
Latin -
 Latvian
 -
 Lithuanian
 -
 Luxembourgish
 -
 Macedonian
 -
 Malgashi
 -
 Malay
Malay -
 Malayalam
 -
 Maltese
 -
 Maori
Maori -
 Marathi
 -
 Mongolian
 -
 Myanmar
 -
 Nepali
 -
 Norwegian
 -
 Norwegian
 -
 Occitan
 -
 Pashto
 -
 Persian
 -
 Polish
 -
 Portuguese
 -
 Punjabi
 -
 Romanian
 -
 Russian
 -
 Samoan
 -
 Scottish Gaelic
 -
 Serbian
 -
 Sesotho
 -
 Shona
Shona -
 Sindhi
 -
 Sinhala
 -
 Slovak
 -
 Slovenian
 -
 Somali
 -
 Spanish
 -
 Sundanese
 -
 Swahili
 -
 Swedish
 -
 Tagalog
 -
 Tajik
Tajik -
 Tamil
Tamil -
 Tatar
Tatar -
 Telugu
 -
 Thai
Thai -
 Turkish
 -
 Turkmen
 -
 Ukrainian
 -
 Urdu
Urdu -
 Uighur
 -
 Uzbek
Uzbek -
 Vietnamese
 -
 Welsh
Welsh -
 Bantu
Bantu -
 Yiddish
 -
 Yoruba
 -
 Zulu
Zulu
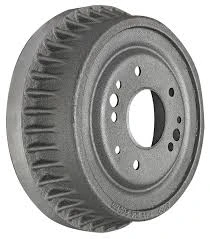
how to assemble drum brakes
How to Assemble Drum Brakes A Step-by-Step Guide
Drum brakes are a common type of braking system found in many vehicles, especially older models and some larger vehicles like trucks and buses. Understanding how to assemble drum brakes is essential for vehicle maintenance and repair, and this guide will help you navigate the process smoothly.
Tools and Materials Needed
Before you begin the assembly, ensure you have the following tools handy
- Socket set - Wrenches - Screwdrivers - Brake spring tool - Pliers - Torque wrench - Clean rags - Brake cleaner
Step 1 Preparing the Vehicle
Begin by safely lifting the vehicle using a jack and securing it with jack stands. Remove the wheel to access the drum brake assembly. If you’re replacing the brakes, it's beneficial to take a picture of the current setup, as this will serve as a helpful reference during assembly.
Step 2 Inspecting Components
Examine the brake drum, shoes, springs, and other components for wear and damage. If any parts are worn down or damaged—such as the brake shoes or the drum itself—it’s essential to replace them before reassembly for optimal performance and safety.
Step 3 Cleaning the Components
Dust, debris, and oil can accumulate in the braking system and affect performance. Use brake cleaner to thoroughly clean the brake drum and any other components that will be reused. Avoid using lubricants on any braking surfaces, as they can reduce friction.
Step 4 Installing the Brake Shoes
Take the new brake shoes and install them into the brake backing plate. The shoes should be positioned so that the friction material faces inward, ready to make contact with the drum. Typically, the primary shoe will be installed on the front side of the assembly, while the secondary shoe will go on the rear.
how to assemble drum brakes

Step 5 Attaching the Springs
Using a brake spring tool, attach the return springs to the brake shoes. The springs help to pull the shoes back into the resting position when the brake pedal is released. Ensure that the springs are securely fastened and properly positioned to avoid interference with the brake operation.
Step 6 Connecting the Adjuster
The brake adjuster, also known as the star wheel, needs to be connected next. This component allows for automatic adjustment of the brake shoes as they wear down. Position the adjuster between the two shoes and ensure it is secure, as it plays a critical role in maintaining optimal brake performance.
Step 7 Installing the Brake Drum
Carefully slide the brake drum over the assembled brake shoes. Ensure that it rotates freely without binding or excessive resistance. If you encounter any issues, double-check that the shoes are positioned correctly and that the springs are not restricting movement.
Step 8 Rechecking and Final Adjustments
With the drum in place, it’s time to recheck all your connections and ensure everything is secure. Spin the drum to ensure it moves smoothly and check the clearance between the shoes and the drum.
Step 9 Reattaching the Wheel
Once satisfied with the installation, reattach the wheel and lower the vehicle back to the ground. Tighten the lug nuts to the manufacturer’s specified torque using a torque wrench for safety.
Conclusion
Assembling drum brakes can seem daunting at first, but with the right tools, materials, and this step-by-step guide, it can be undertaken successfully. Regular maintenance and proper assembly ensure safe and effective braking performance, contributing to safer driving experiences. Remember, if you ever feel uncertain, consulting a professional mechanic is always a good choice.
-
What Are Drum BrakesNewsJul.07,2025
-
Understanding Brake Drum MaterialNewsJul.07,2025
-
Semi-Trailer Brake Drum: A Key Component for Extreme Loads and Long-Distance TransportNewsJul.07,2025
-
Drum Brake Pads for SaleNewsJul.07,2025
-
Brake Drums for SaleNewsJul.07,2025
-
Brake Drum ManufacturerNewsJul.07,2025
-
Aluminum Brake Drums: The Future of High-Performance CarsNewsJul.07,2025
