-
 Afrikaans
 -
 Albanian
 -
 Amharic
 -
 Arabic
 -
 Armenian
 -
 Azerbaijani
 -
 Basque
 -
 Belarusian
 -
 Bengali
 -
 Bosnian
 -
 Bulgarian
 -
 Catalan
 -
 Cebuano
 -
 Corsican
 -
 Croatian
 -
 Czech
Czech -
 Danish
 -
 Dutch
Dutch -
 English
 -
 Esperanto
 -
 Estonian
 -
 Finnish
 -
 French
 -
 Frisian
 -
 Galician
 -
 Georgian
 -
 German
 -
 Greek
Greek -
 Gujarati
 -
 Haitian Creole
 -
 hausa
hausa -
 hawaiian
 -
 Hebrew
 -
 Hindi
Hindi -
 Miao
Miao -
 Hungarian
 -
 Icelandic
 -
 igbo
igbo -
 Indonesian
 -
 irish
irish -
 Italian
 -
 Japanese
 -
 Javanese
 -
 Kannada
 -
 kazakh
 -
 Khmer
Khmer -
 Rwandese
 -
 Korean
 -
 Kurdish
 -
 Kyrgyz
 -
 Lao
Lao -
 Latin
Latin -
 Latvian
 -
 Lithuanian
 -
 Luxembourgish
 -
 Macedonian
 -
 Malgashi
 -
 Malay
Malay -
 Malayalam
 -
 Maltese
 -
 Maori
Maori -
 Marathi
 -
 Mongolian
 -
 Myanmar
 -
 Nepali
 -
 Norwegian
 -
 Norwegian
 -
 Occitan
 -
 Pashto
 -
 Persian
 -
 Polish
 -
 Portuguese
 -
 Punjabi
 -
 Romanian
 -
 Russian
 -
 Samoan
 -
 Scottish Gaelic
 -
 Serbian
 -
 Sesotho
 -
 Shona
Shona -
 Sindhi
 -
 Sinhala
 -
 Slovak
 -
 Slovenian
 -
 Somali
 -
 Spanish
 -
 Sundanese
 -
 Swahili
 -
 Swedish
 -
 Tagalog
 -
 Tajik
Tajik -
 Tamil
Tamil -
 Tatar
Tatar -
 Telugu
 -
 Thai
Thai -
 Turkish
 -
 Turkmen
 -
 Ukrainian
 -
 Urdu
Urdu -
 Uighur
 -
 Uzbek
Uzbek -
 Vietnamese
 -
 Welsh
Welsh -
 Bantu
Bantu -
 Yiddish
 -
 Yoruba
 -
 Zulu
Zulu
A Guide to Assembling Drum Brakes for Optimal Performance and Safety
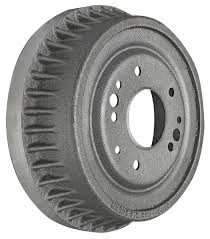
How to Assemble Drum Brakes
Drum brakes are a crucial component of many vehicles, providing the necessary force to slow down or stop your vehicle when needed. Assembling drum brakes might seem daunting, but with the right tools and a bit of guidance, you can successfully complete this task. In this guide, we will walk you through the steps necessary to assemble drum brakes, ensuring your vehicle operates safely and efficiently.
Tools and Materials Needed
Before you start, it’s important to gather all the necessary tools and materials. Here’s what you will need
2. Materials - New brake shoes - Brake drum - Brake hardware kit (springs, clips, etc.) - Brake cleaner - Lubricant (for contacting parts)
Step-by-Step Assembly
1. Preparation Begin by ensuring the vehicle is secure. Park the vehicle on a flat surface, engage the parking brake, and wear safety goggles. It is advisable to lift the car with a jack and support it with jack stands.
2. Remove the Old Brake Components If you are replacing existing drum brakes, you will first need to remove the old components. Take off the wheel to access the brake drum. Remove the drum by gently pulling it off the wheel hub. If it’s stuck, you may need to tap it lightly with a hammer to loosen it.
how to assemble drum brakes

3. Inspect and Clean Before proceeding, inspect the brake components and the drum for any signs of wear or damage. Use brake cleaner to clean the inside of the drum and any other parts that will be reinstalled.
4. Install New Brake Shoes Take your new brake shoes from the hardware kit. Starting with one shoe, align it with the anchor point on the backing plate and secure it in place. Repeat the process for the other shoe. Make sure the shoes move freely and are properly aligned.
5. Attach the Hardware Components Use the brake spring tool to install the return springs. These springs should connect the two shoes and ensure they return to their original positions once the brakes are released. Be sure to follow the specific configuration for your brake system as per the vehicle's manual.
6. Install the Brake Drum Once the shoes and hardware are installed, carefully slide the brake drum over the shoes. It should fit snugly but rotate freely. If the drum does not fit, check that the shoes are properly aligned and that the hardware is installed correctly.
7. Adjust the Shoes Most drum brakes have an adjustment mechanism to ensure the shoes fit perfectly inside the drum. Adjust the shoes so they are just slightly touching the drum, allowing for minimal drag while still providing effective braking.
8. Reassemble the Wheel Once everything is correctly installed and adjusted, it’s time to reattach the wheel. Ensure that all lug nuts are securely fastened and then lower the vehicle back to the ground.
9. Test Your Work Before driving on the road, it’s critical to test the brakes. Pump the brake pedal a few times to seat the shoes against the drum properly. Then, take a slow test drive to ensure everything is functioning smoothly. Listen for any unusual noises and check that the brakes engage properly.
Conclusion
Assembling drum brakes may require time and patience, but following these steps can make the process manageable. Regular maintenance and timely replacement of brake components are essential for your vehicle's safety and performance. Always refer to your vehicle’s manual for specific instructions and guidelines related to your model, and when in doubt, consult a professional mechanic. Safe driving!
-
What Are Drum BrakesNewsJul.07,2025
-
Understanding Brake Drum MaterialNewsJul.07,2025
-
Semi-Trailer Brake Drum: A Key Component for Extreme Loads and Long-Distance TransportNewsJul.07,2025
-
Drum Brake Pads for SaleNewsJul.07,2025
-
Brake Drums for SaleNewsJul.07,2025
-
Brake Drum ManufacturerNewsJul.07,2025
-
Aluminum Brake Drums: The Future of High-Performance CarsNewsJul.07,2025
