-
 Afrikaans
 -
 Albanian
 -
 Amharic
 -
 Arabic
 -
 Armenian
 -
 Azerbaijani
 -
 Basque
 -
 Belarusian
 -
 Bengali
 -
 Bosnian
 -
 Bulgarian
 -
 Catalan
 -
 Cebuano
 -
 Corsican
 -
 Croatian
 -
 Czech
Czech -
 Danish
 -
 Dutch
Dutch -
 English
 -
 Esperanto
 -
 Estonian
 -
 Finnish
 -
 French
 -
 Frisian
 -
 Galician
 -
 Georgian
 -
 German
 -
 Greek
Greek -
 Gujarati
 -
 Haitian Creole
 -
 hausa
hausa -
 hawaiian
 -
 Hebrew
 -
 Hindi
Hindi -
 Miao
Miao -
 Hungarian
 -
 Icelandic
 -
 igbo
igbo -
 Indonesian
 -
 irish
irish -
 Italian
 -
 Japanese
 -
 Javanese
 -
 Kannada
 -
 kazakh
 -
 Khmer
Khmer -
 Rwandese
 -
 Korean
 -
 Kurdish
 -
 Kyrgyz
 -
 Lao
Lao -
 Latin
Latin -
 Latvian
 -
 Lithuanian
 -
 Luxembourgish
 -
 Macedonian
 -
 Malgashi
 -
 Malay
Malay -
 Malayalam
 -
 Maltese
 -
 Maori
Maori -
 Marathi
 -
 Mongolian
 -
 Myanmar
 -
 Nepali
 -
 Norwegian
 -
 Norwegian
 -
 Occitan
 -
 Pashto
 -
 Persian
 -
 Polish
 -
 Portuguese
 -
 Punjabi
 -
 Romanian
 -
 Russian
 -
 Samoan
 -
 Scottish Gaelic
 -
 Serbian
 -
 Sesotho
 -
 Shona
Shona -
 Sindhi
 -
 Sinhala
 -
 Slovak
 -
 Slovenian
 -
 Somali
 -
 Spanish
 -
 Sundanese
 -
 Swahili
 -
 Swedish
 -
 Tagalog
 -
 Tajik
Tajik -
 Tamil
Tamil -
 Tatar
Tatar -
 Telugu
 -
 Thai
Thai -
 Turkish
 -
 Turkmen
 -
 Ukrainian
 -
 Urdu
Urdu -
 Uighur
 -
 Uzbek
Uzbek -
 Vietnamese
 -
 Welsh
Welsh -
 Bantu
Bantu -
 Yiddish
 -
 Yoruba
 -
 Zulu
Zulu
Methods to Inspect Drum Brake Pads for Safety and Performance
How to Check Drum Brake Pads A Comprehensive Guide
Maintaining your vehicle's braking system is essential for safety and performance. One key component of this system is the drum brake, which is commonly found in older vehicles and some modern ones, particularly in the rear. Drum brakes use brake shoes to press against the inner surface of a drum to slow down the vehicle. Understanding how to check drum brake pads is crucial for any car owner. In this article, we will walk you through the process step-by-step.
1. Gather Your Tools
Before you begin inspecting your drum brake pads, make sure you have the necessary tools. You’ll need a jack and jack stands to lift the vehicle, a lug wrench to remove the wheel, a brake cleaner, a measuring tool (like a caliper or ruler), and basic hand tools like wrenches or screwdrivers if disassembly is required. Always prioritize safety by working on a flat surface and wearing protective gear.
2. Lift the Vehicle
Start by loosening the lug nuts on the wheel where you want to inspect the brakes. Do not remove them completely yet. Next, use the jack to lift the vehicle and secure it with jack stands. Once stable, fully remove the lug nuts and take off the wheel. This will expose the drum brake assembly.
3. Inspect the Brake Drum
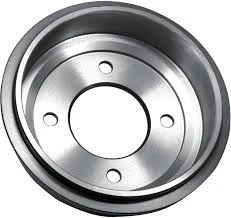
With the wheel removed, you’ll see the drum brake assembly, including the brake drum itself. Carefully examine the drum for any visible signs of wear or damage. Look for cracks, deep grooves, or an uneven surface. If the drum shows significant wear, it may need to be replaced.
To check the brake shoes, you will need to remove the drum. Depending on your vehicle, this may require loosening some retaining screws or clips. Gently slide the drum off the wheel hub. Be cautious; if the drum is stuck due to rust or dirt, you may need to tap it lightly with a rubber mallet to free it.
how to check drum brake pads

5. Examine the Brake Pads (Shoes)
Once the drum is removed, inspect the brake shoes. Look at the friction material; it should be at least 1/8 inch thick. If you notice that the thickness is significantly less, it’s time to replace the shoes. Also, check for even wear across the shoes. Uneven wear can indicate issues with the braking system, such as misalignment.
6. Check the Hardware
While inspecting the brake shoes, also check the condition of the hardware, such as springs, clips, and adjusting mechanisms. Worn or damaged hardware can lead to improper functioning of the brake system. Replace any parts that show signs of wear.
7. Clean and Reassemble
If everything looks good, use brake cleaner to remove dust and grime from the drum and shoes. Once they are clean, reassemble the drum brake assembly, ensuring all components are properly aligned and secured. Replace the drum, wheel, and lug nuts, tightening them in a star pattern to ensure even pressure.
8. Test Drive
Finally, lower the vehicle and take it for a test drive in a safe area. Listen for any unusual noises and pay attention to how the brakes feel. If everything works smoothly, you’ve successfully checked your drum brake pads.
Regular inspection of your drum brake system is key to vehicle safety. By following these steps, you can ensure that your brakes are functioning properly, ultimately contributing to a safer driving experience. Regular checks can save you from costly repairs and potential accidents in the long run.
-
What Are Drum BrakesNewsJul.07,2025
-
Understanding Brake Drum MaterialNewsJul.07,2025
-
Semi-Trailer Brake Drum: A Key Component for Extreme Loads and Long-Distance TransportNewsJul.07,2025
-
Drum Brake Pads for SaleNewsJul.07,2025
-
Brake Drums for SaleNewsJul.07,2025
-
Brake Drum ManufacturerNewsJul.07,2025
-
Aluminum Brake Drums: The Future of High-Performance CarsNewsJul.07,2025
