-
 Afrikaans
 -
 Albanian
 -
 Amharic
 -
 Arabic
 -
 Armenian
 -
 Azerbaijani
 -
 Basque
 -
 Belarusian
 -
 Bengali
 -
 Bosnian
 -
 Bulgarian
 -
 Catalan
 -
 Cebuano
 -
 Corsican
 -
 Croatian
 -
 Czech
Czech -
 Danish
 -
 Dutch
Dutch -
 English
 -
 Esperanto
 -
 Estonian
 -
 Finnish
 -
 French
 -
 Frisian
 -
 Galician
 -
 Georgian
 -
 German
 -
 Greek
Greek -
 Gujarati
 -
 Haitian Creole
 -
 hausa
hausa -
 hawaiian
 -
 Hebrew
 -
 Hindi
Hindi -
 Miao
Miao -
 Hungarian
 -
 Icelandic
 -
 igbo
igbo -
 Indonesian
 -
 irish
irish -
 Italian
 -
 Japanese
 -
 Javanese
 -
 Kannada
 -
 kazakh
 -
 Khmer
Khmer -
 Rwandese
 -
 Korean
 -
 Kurdish
 -
 Kyrgyz
 -
 Lao
Lao -
 Latin
Latin -
 Latvian
 -
 Lithuanian
 -
 Luxembourgish
 -
 Macedonian
 -
 Malgashi
 -
 Malay
Malay -
 Malayalam
 -
 Maltese
 -
 Maori
Maori -
 Marathi
 -
 Mongolian
 -
 Myanmar
 -
 Nepali
 -
 Norwegian
 -
 Norwegian
 -
 Occitan
 -
 Pashto
 -
 Persian
 -
 Polish
 -
 Portuguese
 -
 Punjabi
 -
 Romanian
 -
 Russian
 -
 Samoan
 -
 Scottish Gaelic
 -
 Serbian
 -
 Sesotho
 -
 Shona
Shona -
 Sindhi
 -
 Sinhala
 -
 Slovak
 -
 Slovenian
 -
 Somali
 -
 Spanish
 -
 Sundanese
 -
 Swahili
 -
 Swedish
 -
 Tagalog
 -
 Tajik
Tajik -
 Tamil
Tamil -
 Tatar
Tatar -
 Telugu
 -
 Thai
Thai -
 Turkish
 -
 Turkmen
 -
 Ukrainian
 -
 Urdu
Urdu -
 Uighur
 -
 Uzbek
Uzbek -
 Vietnamese
 -
 Welsh
Welsh -
 Bantu
Bantu -
 Yiddish
 -
 Yoruba
 -
 Zulu
Zulu
how to convert brake drum to disc brakes
Converting Brake Drums to Disc Brakes A Comprehensive Guide
Upgrading your vehicle's braking system from drum brakes to disc brakes can significantly enhance performance and safety. This conversion is particularly popular among automotive enthusiasts looking to improve their car's handling, stopping power, and overall reliability. In this guide, we’ll explore the essential steps and considerations involved in this conversion process.
Understanding the Differences
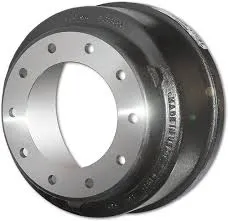
Before diving into the conversion, it’s important to understand the differences between drum and disc brakes. Drum brakes consist of a hollow drum that rotates with the wheel, while brake shoes press against the inner surface to create friction. Conversely, disc brakes use a flat, circular disc that is clamped by brake pads, allowing for faster heat dissipation and improved stopping power. This fundamental difference is why disc brakes are often favored for high-performance vehicles.
Steps for Conversion
1. Research Compatibility The first step in the conversion process is to ensure that the disc brake components are compatible with your vehicle’s make and model. Different vehicles have different requirements, so it’s crucial to gather parts that are specifically designed for your car.
2. Gather Necessary Parts You will need several components for the conversion, including - Disc brake rotors - Brake calipers - Brake pads - Brake lines (if necessary) - Mounting brackets and hardware - A new master cylinder may also be required to accommodate the increased fluid pressure needed for disc brakes.
3. Lift the Vehicle Safely lift the vehicle using a jack and secure it with jack stands. Make sure to work on a flat surface to prevent accidents.
how to convert brake drum to disc brakes

4. Remove the Existing Brake Drums Start by removing the wheels, and then take off the brake drums. This typically involves unbolting the drum from the wheel hub. Be careful to remove any retaining clips that may be present.
5. Install New Components Begin installing the brake rotor by placing it on the wheel hub. Then, attach the caliper bracket (if separate) and mount the brake caliper over the rotor. Follow the manufacturer’s instructions for torque specifications to ensure everything is secure.
6. Connect Brake Lines If your new calipers require different brake lines, be sure to replace the old lines with compatible ones. This step may involve bleeding the brakes to ensure there are no air pockets in the system.
7. Adjust the Master Cylinder If a new master cylinder is required, replace it according to the manufacturer’s guidelines. This is crucial as disc brakes generally require a different hydraulic pressure than drum brakes.
8. Test the System Once everything is installed, it’s essential to test the braking system. Start by gently pressing the brake pedal to check for proper function, and make sure there are no leaks in the brake lines. Take the vehicle for a test drive to ensure everything is working as intended.
Conclusion
Converting from brake drums to disc brakes is a rewarding project that can tremendously enhance your vehicle's performance. While the process requires a good understanding of automotive systems and a careful approach to installation, the benefits in terms of safety and driving experience are well worth the effort. Whether you are a seasoned mechanic or a DIY enthusiast, this upgrade can give your vehicle a new lease on life. Always consult with a professional if you are uncertain about any steps in the process to ensure safety and efficiency.
-
What Are Drum BrakesNewsJul.07,2025
-
Understanding Brake Drum MaterialNewsJul.07,2025
-
Semi-Trailer Brake Drum: A Key Component for Extreme Loads and Long-Distance TransportNewsJul.07,2025
-
Drum Brake Pads for SaleNewsJul.07,2025
-
Brake Drums for SaleNewsJul.07,2025
-
Brake Drum ManufacturerNewsJul.07,2025
-
Aluminum Brake Drums: The Future of High-Performance CarsNewsJul.07,2025
