-
 Afrikaans
 -
 Albanian
 -
 Amharic
 -
 Arabic
 -
 Armenian
 -
 Azerbaijani
 -
 Basque
 -
 Belarusian
 -
 Bengali
 -
 Bosnian
 -
 Bulgarian
 -
 Catalan
 -
 Cebuano
 -
 Corsican
 -
 Croatian
 -
 Czech
Czech -
 Danish
 -
 Dutch
Dutch -
 English
 -
 Esperanto
 -
 Estonian
 -
 Finnish
 -
 French
 -
 Frisian
 -
 Galician
 -
 Georgian
 -
 German
 -
 Greek
Greek -
 Gujarati
 -
 Haitian Creole
 -
 hausa
hausa -
 hawaiian
 -
 Hebrew
 -
 Hindi
Hindi -
 Miao
Miao -
 Hungarian
 -
 Icelandic
 -
 igbo
igbo -
 Indonesian
 -
 irish
irish -
 Italian
 -
 Japanese
 -
 Javanese
 -
 Kannada
 -
 kazakh
 -
 Khmer
Khmer -
 Rwandese
 -
 Korean
 -
 Kurdish
 -
 Kyrgyz
 -
 Lao
Lao -
 Latin
Latin -
 Latvian
 -
 Lithuanian
 -
 Luxembourgish
 -
 Macedonian
 -
 Malgashi
 -
 Malay
Malay -
 Malayalam
 -
 Maltese
 -
 Maori
Maori -
 Marathi
 -
 Mongolian
 -
 Myanmar
 -
 Nepali
 -
 Norwegian
 -
 Norwegian
 -
 Occitan
 -
 Pashto
 -
 Persian
 -
 Polish
 -
 Portuguese
 -
 Punjabi
 -
 Romanian
 -
 Russian
 -
 Samoan
 -
 Scottish Gaelic
 -
 Serbian
 -
 Sesotho
 -
 Shona
Shona -
 Sindhi
 -
 Sinhala
 -
 Slovak
 -
 Slovenian
 -
 Somali
 -
 Spanish
 -
 Sundanese
 -
 Swahili
 -
 Swedish
 -
 Tagalog
 -
 Tajik
Tajik -
 Tamil
Tamil -
 Tatar
Tatar -
 Telugu
 -
 Thai
Thai -
 Turkish
 -
 Turkmen
 -
 Ukrainian
 -
 Urdu
Urdu -
 Uighur
 -
 Uzbek
Uzbek -
 Vietnamese
 -
 Welsh
Welsh -
 Bantu
Bantu -
 Yiddish
 -
 Yoruba
 -
 Zulu
Zulu
how to measure brake drums
How to Measure Brake Drums A Comprehensive Guide
Brake drums are essential components of the braking system in many vehicles, particularly those with drum brakes. Over time, these components can wear down, leading to decreased braking effectiveness and safety concerns. Measuring brake drums accurately is crucial for determining whether they need to be replaced or can be resurfaced. This article will guide you step by step on how to measure brake drums effectively.
Understanding Brake Drums
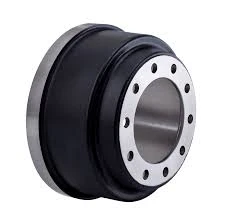
Before diving into the measurement process, it’s vital to understand what brake drums are and how they function. A brake drum is a cylindrical component that houses the brake shoes. When the brake pedal is pressed, the shoes expand against the inner surface of the drum, creating friction and slowing down the vehicle. Regular inspection and measurement of brake drums can help prevent brake failures.
Required Tools
To measure brake drums, you will need a few tools 1. Caliper A dial caliper or digital caliper will provide precise measurements. 2. Brake Drum Micrometer Specifically designed for measuring drum diameters, this tool ensures accurate readings. 3. Ruler or tape measure For general measurements, although calipers are preferred for accuracy. 4. Brake Drum Gauge A specialized tool to measure the wear and taper on drums.
Measurement Process
1. Safety First Always ensure your vehicle is parked on a flat surface, and apply the parking brake. Wear safety equipment like gloves and goggles during the process.
2. Remove the Wheel To access the brake drum, you need to remove the wheel. Use a lug wrench to loosen the lug nuts and then remove the wheel to expose the brake assembly.
how to measure brake drums

3. Inspect the Drum Before measuring, check for any visible signs of damage, such as cracks or deep grooves. These could indicate that the drum needs replacing, regardless of the measurements.
4. Measure the Diameter - Determine the Drum's Inner Diameter Using a brake drum micrometer, measure the inner diameter at several points around the drum. This will help you identify any irregularities or wear patterns. - Take Multiple Measurements Measure at least three points the top, bottom, and sides of the drum. This will give you an accurate average and help you identify any taper or ovalness.
5. Check for Wear It's advisable to compare your measurements against the manufacturer's specifications for maximum allowable diameter. If the measurement exceeds this limit, the drum should be replaced.
6. Measure the Thickness Using calipers, measure the thickness of the drum wall. Check for any signs of thinning, as a worn drum can lead to reduced performance and safety issues.
7. Record Your Findings Document all measurements carefully. Having a record can assist in making informed decisions about repairs or replacements.
When to Replace Brake Drums
If your measurements indicate that the diameter exceeds the manufacturer's specifications or if there are significant wear patterns, it’s time to replace the brake drums. Additionally, if you notice excessive cracking or warping, replacement is necessary for safety.
Conclusion
Measuring brake drums is a straightforward yet crucial task for maintaining vehicle safety. Regular inspections and proper measurements can prolong the life of your braking system and ensure optimal performance. If you're ever in doubt about your findings, consulting a professional mechanic is always a prudent step. Remember that your safety and that of your passengers is paramount, and maintaining your braking system is an essential part of vehicle upkeep.
-
What Are Drum BrakesNewsJul.07,2025
-
Understanding Brake Drum MaterialNewsJul.07,2025
-
Semi-Trailer Brake Drum: A Key Component for Extreme Loads and Long-Distance TransportNewsJul.07,2025
-
Drum Brake Pads for SaleNewsJul.07,2025
-
Brake Drums for SaleNewsJul.07,2025
-
Brake Drum ManufacturerNewsJul.07,2025
-
Aluminum Brake Drums: The Future of High-Performance CarsNewsJul.07,2025
