-
 Afrikaans
 -
 Albanian
 -
 Amharic
 -
 Arabic
 -
 Armenian
 -
 Azerbaijani
 -
 Basque
 -
 Belarusian
 -
 Bengali
 -
 Bosnian
 -
 Bulgarian
 -
 Catalan
 -
 Cebuano
 -
 Corsican
 -
 Croatian
 -
 Czech
Czech -
 Danish
 -
 Dutch
Dutch -
 English
 -
 Esperanto
 -
 Estonian
 -
 Finnish
 -
 French
 -
 Frisian
 -
 Galician
 -
 Georgian
 -
 German
 -
 Greek
Greek -
 Gujarati
 -
 Haitian Creole
 -
 hausa
hausa -
 hawaiian
 -
 Hebrew
 -
 Hindi
Hindi -
 Miao
Miao -
 Hungarian
 -
 Icelandic
 -
 igbo
igbo -
 Indonesian
 -
 irish
irish -
 Italian
 -
 Japanese
 -
 Javanese
 -
 Kannada
 -
 kazakh
 -
 Khmer
Khmer -
 Rwandese
 -
 Korean
 -
 Kurdish
 -
 Kyrgyz
 -
 Lao
Lao -
 Latin
Latin -
 Latvian
 -
 Lithuanian
 -
 Luxembourgish
 -
 Macedonian
 -
 Malgashi
 -
 Malay
Malay -
 Malayalam
 -
 Maltese
 -
 Maori
Maori -
 Marathi
 -
 Mongolian
 -
 Myanmar
 -
 Nepali
 -
 Norwegian
 -
 Norwegian
 -
 Occitan
 -
 Pashto
 -
 Persian
 -
 Polish
 -
 Portuguese
 -
 Punjabi
 -
 Romanian
 -
 Russian
 -
 Samoan
 -
 Scottish Gaelic
 -
 Serbian
 -
 Sesotho
 -
 Shona
Shona -
 Sindhi
 -
 Sinhala
 -
 Slovak
 -
 Slovenian
 -
 Somali
 -
 Spanish
 -
 Sundanese
 -
 Swahili
 -
 Swedish
 -
 Tagalog
 -
 Tajik
Tajik -
 Tamil
Tamil -
 Tatar
Tatar -
 Telugu
 -
 Thai
Thai -
 Turkish
 -
 Turkmen
 -
 Ukrainian
 -
 Urdu
Urdu -
 Uighur
 -
 Uzbek
Uzbek -
 Vietnamese
 -
 Welsh
Welsh -
 Bantu
Bantu -
 Yiddish
 -
 Yoruba
 -
 Zulu
Zulu
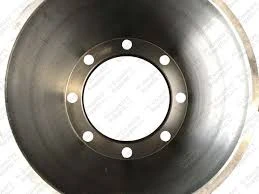
how to remove a brake drum
How to Remove a Brake Drum A Step-by-Step Guide
Removing a brake drum is a crucial skill for any DIY automotive enthusiast or a necessity when engaging in routine vehicle maintenance. Whether you're replacing brakes, checking for wear, or performing a complete brake service, knowing how to remove a brake drum will save you time and money. Here’s a step-by-step guide to help you through the process.
Tools and Materials Needed - Jack and jack stands - Lug wrench - Brake drum puller (optional for stubborn drums) - Screwdriver - Brake cleaner - Shop towels or rags
Step 1 Prepare the Vehicle Before starting, ensure the car is parked on a flat surface. Set the parking brake and loosen the lug nuts slightly while the wheel is still on the ground. This prevents the wheel from spinning while you try to loosen it.
Step 2 Lift the Vehicle Use the jack to lift the car off the ground and securely place jack stands under the vehicle for safety. Make sure the vehicle is stable before proceeding.
Step 3 Remove the Wheel Completely unscrew the loosened lug nuts and remove the wheel from the hub
. Set the wheel aside in a safe location.Step 4 Assess the Brake Drum Inspect the brake drum for any visible damage or wear. If it appears to be in good condition and free from rust or debris, you can proceed with removal.
how to remove a brake drum

Step 5 Remove Retaining Screws Check if there are any retaining screws holding the brake drum in place. If present, use a screwdriver to remove these screws carefully.
Step 6 Detach the Brake Drum Gently pull the brake drum off the wheel hub. If it seems stuck due to rust or debris, don’t force it. Use a brake drum puller to apply even pressure and help free it. Spray some brake cleaner to loosen any grime while you work.
Step 7 Inspect Components Once the drum is removed, check the brake shoes, springs, and hardware for wear. This is an excellent opportunity to replace or service any components that may be worn out.
Step 8 Clean Up Before reinstalling or replacing parts, clean the drum and surrounding areas with brake cleaner to remove dust and debris.
Step 9 Reassemble If you are reinstalling the drum, simply reverse the steps to put everything back together. Ensure all screws are tightened, and the wheel is secured properly.
Conclusion Removing a brake drum can be an easy task if done with the right tools and steps. Always prioritize safety and don’t hesitate to consult a professional if you encounter issues. With this knowledge, you can maintain your vehicle more effectively and confidently tackle other automotive projects.
-
What Are Drum BrakesNewsJul.07,2025
-
Understanding Brake Drum MaterialNewsJul.07,2025
-
Semi-Trailer Brake Drum: A Key Component for Extreme Loads and Long-Distance TransportNewsJul.07,2025
-
Drum Brake Pads for SaleNewsJul.07,2025
-
Brake Drums for SaleNewsJul.07,2025
-
Brake Drum ManufacturerNewsJul.07,2025
-
Aluminum Brake Drums: The Future of High-Performance CarsNewsJul.07,2025
