-
 Afrikaans
 -
 Albanian
 -
 Amharic
 -
 Arabic
 -
 Armenian
 -
 Azerbaijani
 -
 Basque
 -
 Belarusian
 -
 Bengali
 -
 Bosnian
 -
 Bulgarian
 -
 Catalan
 -
 Cebuano
 -
 Corsican
 -
 Croatian
 -
 Czech
Czech -
 Danish
 -
 Dutch
Dutch -
 English
 -
 Esperanto
 -
 Estonian
 -
 Finnish
 -
 French
 -
 Frisian
 -
 Galician
 -
 Georgian
 -
 German
 -
 Greek
Greek -
 Gujarati
 -
 Haitian Creole
 -
 hausa
hausa -
 hawaiian
 -
 Hebrew
 -
 Hindi
Hindi -
 Miao
Miao -
 Hungarian
 -
 Icelandic
 -
 igbo
igbo -
 Indonesian
 -
 irish
irish -
 Italian
 -
 Japanese
 -
 Javanese
 -
 Kannada
 -
 kazakh
 -
 Khmer
Khmer -
 Rwandese
 -
 Korean
 -
 Kurdish
 -
 Kyrgyz
 -
 Lao
Lao -
 Latin
Latin -
 Latvian
 -
 Lithuanian
 -
 Luxembourgish
 -
 Macedonian
 -
 Malgashi
 -
 Malay
Malay -
 Malayalam
 -
 Maltese
 -
 Maori
Maori -
 Marathi
 -
 Mongolian
 -
 Myanmar
 -
 Nepali
 -
 Norwegian
 -
 Norwegian
 -
 Occitan
 -
 Pashto
 -
 Persian
 -
 Polish
 -
 Portuguese
 -
 Punjabi
 -
 Romanian
 -
 Russian
 -
 Samoan
 -
 Scottish Gaelic
 -
 Serbian
 -
 Sesotho
 -
 Shona
Shona -
 Sindhi
 -
 Sinhala
 -
 Slovak
 -
 Slovenian
 -
 Somali
 -
 Spanish
 -
 Sundanese
 -
 Swahili
 -
 Swedish
 -
 Tagalog
 -
 Tajik
Tajik -
 Tamil
Tamil -
 Tatar
Tatar -
 Telugu
 -
 Thai
Thai -
 Turkish
 -
 Turkmen
 -
 Ukrainian
 -
 Urdu
Urdu -
 Uighur
 -
 Uzbek
Uzbek -
 Vietnamese
 -
 Welsh
Welsh -
 Bantu
Bantu -
 Yiddish
 -
 Yoruba
 -
 Zulu
Zulu
Steps to Release a Stuck Brake Drum Effectively and Safely
How to Remove a Seized Brake Drum A Step-by-Step Guide
Removing a seized brake drum can be a challenging task, especially for those not well-versed in automotive repairs. However, with the right tools and approach, you can accomplish this task safely and efficiently. This guide will walk you through the necessary steps to remove a seized brake drum from your vehicle.
Tools and Materials Needed
Before you begin, gather the following tools and materials
- Jack and jack stands - Brake drum puller (if necessary) - Hammer - Penetrating oil (such as WD-40) - Wrenches and sockets - Screwdrivers - Safety goggles and gloves - A clean rag
Step 1 Prepare the Vehicle
First and foremost, ensure the vehicle is parked on a flat surface. Engage the parking brake for additional safety. Before getting underneath, loosen the lug nuts on the wheel that has the seized brake drum. Do not remove them completely at this stage.
Step 2 Lift the Vehicle
Using a jack, lift the vehicle until it is high enough to access the wheel freely. Once elevated, secure it with jack stands for stability. Now you can remove the loosened lug nuts and take off the wheel to expose the brake drum.
Step 3 Inspect the Brake Components
Before proceeding with removal, inspect the brake components. Look for any visible signs of wear or damage, and assess whether the drum is truly seized or if there’s another underlying issue. If the brake shoes are worn too thin, they might be engaging the drum tightly, causing it to appear seized.
Step 4 Apply Penetrating Oil
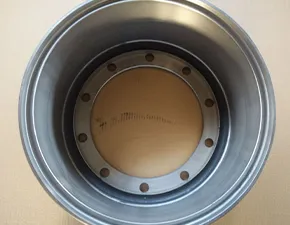
how to remove seized brake drum

If the drum is indeed seized, apply a generous amount of penetrating oil around the drum's hub and along the seams where it meets the axle. Allow the oil to penetrate for at least 15-20 minutes. This will help loosen any rust or debris that might be causing the drum to stick.
Step 5 Try to Remove the Drum
After the oil has had time to soak in, attempt to remove the drum by pulling it straight off. Sometimes a light tap from a hammer around the edges of the drum can help dislodge it. Be gentle, as excessive force can damage the drum or the braking system.
Step 6 Use a Brake Drum Puller
If the drum does not budge, it may be time to utilize a brake drum puller. A brake drum puller is specifically designed to remove stuck brake drums without causing damage. Follow the tool’s instructions to securely attach it to the drum and gradually apply pressure until the drum releases.
Step 7 Check the Brake Shoes
Once the drum is removed, inspect the brake shoes. If they are excessively worn or damaged, consider replacing them. This is also a good time to clean the brake assembly and ensure that everything is functioning properly.
Step 8 Reassemble and Test
After addressing any issues, it’s time to reassemble the components. Replace the brake drum, wheel, and lug nuts. Carefully lower the vehicle back to the ground and tighten the lug nuts securely. Finally, pump the brake pedal a few times to ensure proper function before taking the vehicle for a test drive.
Conclusion
Removing a seized brake drum can be a daunting task, but with patience and the right tools, it can be accomplished. Always prioritize safety by wearing protective gear and ensuring your vehicle is secure. If you’re uncertain at any point, don’t hesitate to seek assistance from a professional mechanic. Remember, proper maintenance of your braking system is crucial for your vehicle’s safety on the road.
-
What Are Drum BrakesNewsJul.07,2025
-
Understanding Brake Drum MaterialNewsJul.07,2025
-
Semi-Trailer Brake Drum: A Key Component for Extreme Loads and Long-Distance TransportNewsJul.07,2025
-
Drum Brake Pads for SaleNewsJul.07,2025
-
Brake Drums for SaleNewsJul.07,2025
-
Brake Drum ManufacturerNewsJul.07,2025
-
Aluminum Brake Drums: The Future of High-Performance CarsNewsJul.07,2025
