-
 Afrikaans
 -
 Albanian
 -
 Amharic
 -
 Arabic
 -
 Armenian
 -
 Azerbaijani
 -
 Basque
 -
 Belarusian
 -
 Bengali
 -
 Bosnian
 -
 Bulgarian
 -
 Catalan
 -
 Cebuano
 -
 Corsican
 -
 Croatian
 -
 Czech
Czech -
 Danish
 -
 Dutch
Dutch -
 English
 -
 Esperanto
 -
 Estonian
 -
 Finnish
 -
 French
 -
 Frisian
 -
 Galician
 -
 Georgian
 -
 German
 -
 Greek
Greek -
 Gujarati
 -
 Haitian Creole
 -
 hausa
hausa -
 hawaiian
 -
 Hebrew
 -
 Hindi
Hindi -
 Miao
Miao -
 Hungarian
 -
 Icelandic
 -
 igbo
igbo -
 Indonesian
 -
 irish
irish -
 Italian
 -
 Japanese
 -
 Javanese
 -
 Kannada
 -
 kazakh
 -
 Khmer
Khmer -
 Rwandese
 -
 Korean
 -
 Kurdish
 -
 Kyrgyz
 -
 Lao
Lao -
 Latin
Latin -
 Latvian
 -
 Lithuanian
 -
 Luxembourgish
 -
 Macedonian
 -
 Malgashi
 -
 Malay
Malay -
 Malayalam
 -
 Maltese
 -
 Maori
Maori -
 Marathi
 -
 Mongolian
 -
 Myanmar
 -
 Nepali
 -
 Norwegian
 -
 Norwegian
 -
 Occitan
 -
 Pashto
 -
 Persian
 -
 Polish
 -
 Portuguese
 -
 Punjabi
 -
 Romanian
 -
 Russian
 -
 Samoan
 -
 Scottish Gaelic
 -
 Serbian
 -
 Sesotho
 -
 Shona
Shona -
 Sindhi
 -
 Sinhala
 -
 Slovak
 -
 Slovenian
 -
 Somali
 -
 Spanish
 -
 Sundanese
 -
 Swahili
 -
 Swedish
 -
 Tagalog
 -
 Tajik
Tajik -
 Tamil
Tamil -
 Tatar
Tatar -
 Telugu
 -
 Thai
Thai -
 Turkish
 -
 Turkmen
 -
 Ukrainian
 -
 Urdu
Urdu -
 Uighur
 -
 Uzbek
Uzbek -
 Vietnamese
 -
 Welsh
Welsh -
 Bantu
Bantu -
 Yiddish
 -
 Yoruba
 -
 Zulu
Zulu
how to replace drum brakes with disc brakes
How to Replace Drum Brakes with Disc Brakes
Upgrading from drum brakes to disc brakes can significantly enhance your vehicle's braking performance and handling. Whether you're looking to improve your car's stopping power or reduce brake fade, transitioning to disc brakes is a worthwhile investment. Here’s a step-by-step guide to help you through this process.
1. Gather Necessary Tools and Parts
Before starting, ensure you have all the required tools and parts. You’ll need
- New disc brake calipers - Disc rotors - Brake pads - Brake lines - Wrenches and sockets - A jack and jack stands - Brake fluid - A torque wrench - An impact wrench (optional)
2. Prepare Your Vehicle
Ensure your vehicle is parked on a level surface. Engage the parking brake and loosen the wheel nuts. Use a jack to lift the vehicle, then secure it with jack stands. Remove the wheels to access the drum brakes.
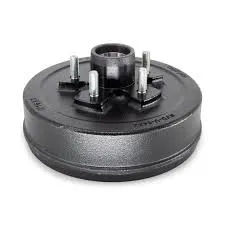
3. Remove Drum Brakes
First, remove the drum brake assembly. This may involve
- Detaching the brake drum by removing the retaining screws. - Pulling the drum off; you may have to tap it gently if it’s stuck. - Disconnecting the brake lines and removing the brake shoes and hardware components.
Be careful when dealing with brake components, and note the arrangement for your reference.
4. Install Disc Brake Components
how to replace drum brakes with disc brakes

Once the drum brakes are removed, it’s time to install the disc brake system
- Mount the Bracket Attach the caliper mounting bracket to the spindle, ensuring it’s aligned correctly. - Install Rotors Slide the new rotors onto the hub. If you’re using new hubs, make sure they’re securely fastened.
- Attach Calipers Place the calipers over the rotors and secure them with the provided hardware. Make sure they are tight and properly positioned.
5. Connect Brake Lines
Next, route the new brake lines from the calipers to the master cylinder. Ensure there are no kinks in the lines and that they are securely fastened to the frame.
6. Add Brake Fluid
Check the brake fluid reservoir and fill it with the appropriate type of brake fluid. Bleed the brakes by having someone press the brake pedal while you open and close the bleeder valve on each caliper, ensuring all air is removed from the lines.
7. Reassemble and Test
After confirming everything is secure, reattach the wheels and lower the vehicle. Take a moment to check all mounting points and ensure everything is properly torqued. Then, conduct a test drive at low speeds to ensure the brakes are functioning correctly and are securely installed.
Conclusion
Replacing drum brakes with disc brakes can offer better performance and reliability. Following these steps can help ensure a successful upgrade. Always consult a professional mechanic if you're unsure about any part of the process to ensure your safety and the performance of your vehicle.
-
What Are Drum BrakesNewsJul.07,2025
-
Understanding Brake Drum MaterialNewsJul.07,2025
-
Semi-Trailer Brake Drum: A Key Component for Extreme Loads and Long-Distance TransportNewsJul.07,2025
-
Drum Brake Pads for SaleNewsJul.07,2025
-
Brake Drums for SaleNewsJul.07,2025
-
Brake Drum ManufacturerNewsJul.07,2025
-
Aluminum Brake Drums: The Future of High-Performance CarsNewsJul.07,2025
