-
 Afrikaans
 -
 Albanian
 -
 Amharic
 -
 Arabic
 -
 Armenian
 -
 Azerbaijani
 -
 Basque
 -
 Belarusian
 -
 Bengali
 -
 Bosnian
 -
 Bulgarian
 -
 Catalan
 -
 Cebuano
 -
 Corsican
 -
 Croatian
 -
 Czech
Czech -
 Danish
 -
 Dutch
Dutch -
 English
 -
 Esperanto
 -
 Estonian
 -
 Finnish
 -
 French
 -
 Frisian
 -
 Galician
 -
 Georgian
 -
 German
 -
 Greek
Greek -
 Gujarati
 -
 Haitian Creole
 -
 hausa
hausa -
 hawaiian
 -
 Hebrew
 -
 Hindi
Hindi -
 Miao
Miao -
 Hungarian
 -
 Icelandic
 -
 igbo
igbo -
 Indonesian
 -
 irish
irish -
 Italian
 -
 Japanese
 -
 Javanese
 -
 Kannada
 -
 kazakh
 -
 Khmer
Khmer -
 Rwandese
 -
 Korean
 -
 Kurdish
 -
 Kyrgyz
 -
 Lao
Lao -
 Latin
Latin -
 Latvian
 -
 Lithuanian
 -
 Luxembourgish
 -
 Macedonian
 -
 Malgashi
 -
 Malay
Malay -
 Malayalam
 -
 Maltese
 -
 Maori
Maori -
 Marathi
 -
 Mongolian
 -
 Myanmar
 -
 Nepali
 -
 Norwegian
 -
 Norwegian
 -
 Occitan
 -
 Pashto
 -
 Persian
 -
 Polish
 -
 Portuguese
 -
 Punjabi
 -
 Romanian
 -
 Russian
 -
 Samoan
 -
 Scottish Gaelic
 -
 Serbian
 -
 Sesotho
 -
 Shona
Shona -
 Sindhi
 -
 Sinhala
 -
 Slovak
 -
 Slovenian
 -
 Somali
 -
 Spanish
 -
 Sundanese
 -
 Swahili
 -
 Swedish
 -
 Tagalog
 -
 Tajik
Tajik -
 Tamil
Tamil -
 Tatar
Tatar -
 Telugu
 -
 Thai
Thai -
 Turkish
 -
 Turkmen
 -
 Ukrainian
 -
 Urdu
Urdu -
 Uighur
 -
 Uzbek
Uzbek -
 Vietnamese
 -
 Welsh
Welsh -
 Bantu
Bantu -
 Yiddish
 -
 Yoruba
 -
 Zulu
Zulu
Converting Drum Brakes to Disc Brakes for Improved Performance and Safety
How to Turn Drum Brakes to Disc Brakes
When it comes to improving your vehicle's braking performance, converting from drum brakes to disc brakes is a popular modification among automotive enthusiasts. Drum brakes are generally less effective than disc brakes, especially in high-performance situations or under heavy loads. This article will guide you through the process of converting drum brakes to disc brakes, highlighting the benefits and essential considerations.
Understanding the Differences
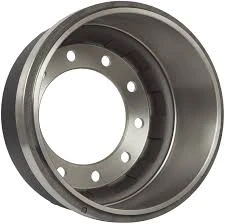
Drum Brakes operate using a brake drum and brake shoes which are pressed against the drum to create friction. While this system is effective for general driving conditions, it suffers from issues like heat dissipation and fading, especially in high-demand situations. In contrast, Disc Brakes consist of a rotor and caliper, where brake pads squeeze the rotor to achieve braking. Disc brakes provide better stopping power, faster cooling, and improved performance.
Advantages of Converting to Disc Brakes
1. Improved Stopping Power Disc brakes provide superior performance, reducing stopping distances and enhancing overall safety. 2. Better Heat Dissipation Disc systems cool more quickly than drum systems, which is critical for maintaining performance during prolonged braking. 3. Less Brake Fade Due to their construction and cooling efficiency, disc brakes handle heat better, reducing the likelihood of brake fade during hard braking. 4. Easier Maintenance Disc brakes are simpler to inspect and replace than drum brakes, which means less maintenance work and hassle in the long run.
Steps for Conversion
1. Assess Compatibility Before starting the conversion, ensure that your vehicle is compatible with disc brakes. Check with your vehicle manufacturer or reference specific conversion kits designed for your model.
3. Prepare Your Vehicle Start by safely lifting the car and removing the wheels. Remove the drum brakes, including the brake shoes, backing plate, and any associated hardware.
how to turn drum brakes to disc

4. Install New Spindles (if required) If your conversion kit requires new spindles, you will need to install them now. Follow the specific installation instructions provided with your kit.
5. Install the Disc Rotors Place the disc rotors onto the new or existing spindles. Ensure they are secured with the appropriate hardware.
6. Attach the Calipers Position the calipers over the rotors and bolt them into place. Make sure to install the brake pads in the caliper housing correctly.
7. Reconnect Brake Lines Attach the new brake lines included in your kit or adapt the existing ones to the new calipers. Ensure all connections are tight to prevent leaks.
8. Bleed the Brakes After everything is assembled, bleed the brake system to remove any air trapped in the lines. This process is crucial for ensuring that your brakes function effectively.
9. Reinstall Wheels and Check Once the brakes are installed and bled, put the wheels back on the vehicle, lower it, and perform a final inspection of the setup.
10. Test Drive Before hitting the road at high speeds, perform a series of slow brake applications in a safe environment to ensure everything is working correctly and to bed the brake pads.
Conclusion
Converting drum brakes to disc brakes not only enhances your vehicle's safety and performance but also adds value and aftermarket appeal. While the conversion process requires some mechanical skill and the right tools, the benefits far outweigh the investment. If you're looking for better braking performance, consider making this significant upgrade to your vehicle's brake system. Always remember to abide by local regulations regarding vehicle modifications and consult professionals if you're uncertain about any steps in the process.
-
What Are Drum BrakesNewsJul.07,2025
-
Understanding Brake Drum MaterialNewsJul.07,2025
-
Semi-Trailer Brake Drum: A Key Component for Extreme Loads and Long-Distance TransportNewsJul.07,2025
-
Drum Brake Pads for SaleNewsJul.07,2025
-
Brake Drums for SaleNewsJul.07,2025
-
Brake Drum ManufacturerNewsJul.07,2025
-
Aluminum Brake Drums: The Future of High-Performance CarsNewsJul.07,2025
