-
 Afrikaans
 -
 Albanian
 -
 Amharic
 -
 Arabic
 -
 Armenian
 -
 Azerbaijani
 -
 Basque
 -
 Belarusian
 -
 Bengali
 -
 Bosnian
 -
 Bulgarian
 -
 Catalan
 -
 Cebuano
 -
 Corsican
 -
 Croatian
 -
 Czech
Czech -
 Danish
 -
 Dutch
Dutch -
 English
 -
 Esperanto
 -
 Estonian
 -
 Finnish
 -
 French
 -
 Frisian
 -
 Galician
 -
 Georgian
 -
 German
 -
 Greek
Greek -
 Gujarati
 -
 Haitian Creole
 -
 hausa
hausa -
 hawaiian
 -
 Hebrew
 -
 Hindi
Hindi -
 Miao
Miao -
 Hungarian
 -
 Icelandic
 -
 igbo
igbo -
 Indonesian
 -
 irish
irish -
 Italian
 -
 Japanese
 -
 Javanese
 -
 Kannada
 -
 kazakh
 -
 Khmer
Khmer -
 Rwandese
 -
 Korean
 -
 Kurdish
 -
 Kyrgyz
 -
 Lao
Lao -
 Latin
Latin -
 Latvian
 -
 Lithuanian
 -
 Luxembourgish
 -
 Macedonian
 -
 Malgashi
 -
 Malay
Malay -
 Malayalam
 -
 Maltese
 -
 Maori
Maori -
 Marathi
 -
 Mongolian
 -
 Myanmar
 -
 Nepali
 -
 Norwegian
 -
 Norwegian
 -
 Occitan
 -
 Pashto
 -
 Persian
 -
 Polish
 -
 Portuguese
 -
 Punjabi
 -
 Romanian
 -
 Russian
 -
 Samoan
 -
 Scottish Gaelic
 -
 Serbian
 -
 Sesotho
 -
 Shona
Shona -
 Sindhi
 -
 Sinhala
 -
 Slovak
 -
 Slovenian
 -
 Somali
 -
 Spanish
 -
 Sundanese
 -
 Swahili
 -
 Swedish
 -
 Tagalog
 -
 Tajik
Tajik -
 Tamil
Tamil -
 Tatar
Tatar -
 Telugu
 -
 Thai
Thai -
 Turkish
 -
 Turkmen
 -
 Ukrainian
 -
 Urdu
Urdu -
 Uighur
 -
 Uzbek
Uzbek -
 Vietnamese
 -
 Welsh
Welsh -
 Bantu
Bantu -
 Yiddish
 -
 Yoruba
 -
 Zulu
Zulu
how to unseize rear drum brakes
How to Unseize Rear Drum Brakes A Step-by-Step Guide
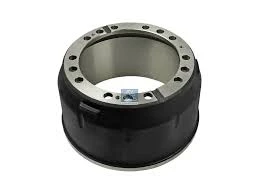
Rear drum brakes are a critical part of your vehicle’s braking system, but like any mechanical component, they can sometimes seize up. This can happen due to rust, lack of use, or an accumulation of brake dust and debris. When rear drum brakes seize, it can lead to poor braking performance, increased wear on the brake components, or even a complete inability to stop the vehicle. Fortunately, unseizing rear drum brakes is a manageable task with the right tools and techniques. Here’s a step-by-step guide to help you get your brakes back in working order.
Step 1 Gather Necessary Tools
Before you begin, gather the necessary tools and supplies. You’ll need - A jack and jack stands - A lug wrench - A brake cleaner - A hammer - A screwdriver (flathead) - Pliers - New brake shoes (if necessary) - Lubricant (like lithium grease)
Step 2 Lift the Vehicle
Start by ensuring your vehicle is parked on a flat surface. Loosen the lug nuts on the rear wheels slightly but do not remove them completely. Next, use a jack to lift the rear of the vehicle and securely place it on jack stands. Ensure the car is stable before proceeding.
Step 3 Remove the Wheel
Once the vehicle is secured on jack stands, remove the lug nuts completely and take off the rear wheel
. This will give you direct access to the drum brake.Step 4 Inspect the Brake Drum
how to unseize rear drum brakes

Examine the drum brake assembly for any visible signs of damage or excessive wear. If the drum is severely rusted or pitted, it may be time to replace it along with the brake shoes. If the drum appears to be in good shape, you can proceed to free it.
Step 5 Remove the Brake Drum
If the brake drum is seized, it may not come off easily. You can use a hammer to gently tap around the edges of the drum to break any rust or debris that may be holding it in place. If this doesn’t work, use a screwdriver to pry it off, taking care not to damage the components.
Step 6 Clean and Lubricate
With the brake drum removed, clean the brake shoes and drum with brake cleaner. Inspect the components for wear; if the brake shoes appear worn, it’s best to replace them. After cleaning, apply a thin layer of lubricant on any moving parts, such as the adjuster.
Step 7 Reassemble and Test
Once everything is clean and any worn parts are replaced, reattach the brake drum and wheel. Tighten the lug nuts in a star pattern to ensure even pressure. Lower the vehicle from the jack stands and take a test drive to ensure that the brakes are functioning properly.
Conclusion
Unseizing rear drum brakes can be a straightforward process if approached methodically. Regular maintenance and inspections can help prevent brake issues before they become significant problems. If you encounter excessive corrosion or damage during your inspection, don’t hesitate to consult a professional mechanic. Your safety is paramount, and a well-functioning brake system is essential for it.
-
What Are Drum BrakesNewsJul.07,2025
-
Understanding Brake Drum MaterialNewsJul.07,2025
-
Semi-Trailer Brake Drum: A Key Component for Extreme Loads and Long-Distance TransportNewsJul.07,2025
-
Drum Brake Pads for SaleNewsJul.07,2025
-
Brake Drums for SaleNewsJul.07,2025
-
Brake Drum ManufacturerNewsJul.07,2025
-
Aluminum Brake Drums: The Future of High-Performance CarsNewsJul.07,2025
