-
 Afrikaans
 -
 Albanian
 -
 Amharic
 -
 Arabic
 -
 Armenian
 -
 Azerbaijani
 -
 Basque
 -
 Belarusian
 -
 Bengali
 -
 Bosnian
 -
 Bulgarian
 -
 Catalan
 -
 Cebuano
 -
 Corsican
 -
 Croatian
 -
 Czech
Czech -
 Danish
 -
 Dutch
Dutch -
 English
 -
 Esperanto
 -
 Estonian
 -
 Finnish
 -
 French
 -
 Frisian
 -
 Galician
 -
 Georgian
 -
 German
 -
 Greek
Greek -
 Gujarati
 -
 Haitian Creole
 -
 hausa
hausa -
 hawaiian
 -
 Hebrew
 -
 Hindi
Hindi -
 Miao
Miao -
 Hungarian
 -
 Icelandic
 -
 igbo
igbo -
 Indonesian
 -
 irish
irish -
 Italian
 -
 Japanese
 -
 Javanese
 -
 Kannada
 -
 kazakh
 -
 Khmer
Khmer -
 Rwandese
 -
 Korean
 -
 Kurdish
 -
 Kyrgyz
 -
 Lao
Lao -
 Latin
Latin -
 Latvian
 -
 Lithuanian
 -
 Luxembourgish
 -
 Macedonian
 -
 Malgashi
 -
 Malay
Malay -
 Malayalam
 -
 Maltese
 -
 Maori
Maori -
 Marathi
 -
 Mongolian
 -
 Myanmar
 -
 Nepali
 -
 Norwegian
 -
 Norwegian
 -
 Occitan
 -
 Pashto
 -
 Persian
 -
 Polish
 -
 Portuguese
 -
 Punjabi
 -
 Romanian
 -
 Russian
 -
 Samoan
 -
 Scottish Gaelic
 -
 Serbian
 -
 Sesotho
 -
 Shona
Shona -
 Sindhi
 -
 Sinhala
 -
 Slovak
 -
 Slovenian
 -
 Somali
 -
 Spanish
 -
 Sundanese
 -
 Swahili
 -
 Swedish
 -
 Tagalog
 -
 Tajik
Tajik -
 Tamil
Tamil -
 Tatar
Tatar -
 Telugu
 -
 Thai
Thai -
 Turkish
 -
 Turkmen
 -
 Ukrainian
 -
 Urdu
Urdu -
 Uighur
 -
 Uzbek
Uzbek -
 Vietnamese
 -
 Welsh
Welsh -
 Bantu
Bantu -
 Yiddish
 -
 Yoruba
 -
 Zulu
Zulu
Essential Steps for Effective Drum Brake Service and Maintenance
Seven Major Steps for Drum Brake Service
Drum brakes are a critical component of most vehicles, providing the necessary stopping power to ensure safety on the road. Over time, these brakes can wear down, leading to reduced performance and potential safety hazards. Regular maintenance is essential to keep your drum brakes in optimal condition. Here are seven major steps for drum brake service that every vehicle owner should be familiar with.
1. Gather Necessary Tools and Materials
Before starting any repair or maintenance work on drum brakes, it's important to gather all necessary tools and materials. Common tools include a lug wrench, brake drum puller, socket set, brake cleaner, and a torque wrench. You’ll also need replacement parts like brake shoes, springs, and possibly new drums if the existing ones show signs of wear or damage. Ensuring you have everything on hand will streamline the process and reduce the chance of interruptions.
2. Remove the Wheel
The first step in servicing drum brakes is to safely remove the wheel. Loosen the lug nuts slightly while the vehicle is still on the ground, then lift the vehicle with a jack and secure it on jack stands. Once it is secure, completely remove the lug nuts and take off the wheel. This exposes the brake drum and other components for inspection and maintenance.
3. Inspect the Brake Components
With the wheel removed, visually inspect the evidence of wear on the brake components. Check the brake shoes for thickness, looking for even wear across their surface. Inspect the brake drum for any discoloration, cracks, or scoring that could indicate overheating or damage. It’s crucial to replace any worn or damaged parts at this stage to maintain braking efficiency.
4
. Remove the Brake Drumlist the seven major steps for drum brake service

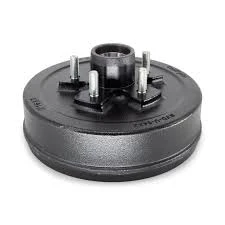
If the brake components look worn or if it’s time for a replacement, the next step is to remove the brake drum. This may require a drum puller if the drum is stuck due to corrosion or wear. Once removed, further inspect the inner surface of the drum and clean it appropriately using brake cleaner to eliminate dust and debris.
5. Replace the Brake Shoes
After removing the drum, replace the old brake shoes with new ones. Ensure that all springs and hardware are also replaced, as they can wear down over time. Follow the manufacturer’s guidelines for proper installation, paying close attention to the positioning of springs and adjusters, which can significantly affect brake performance.
6. Reinstall the Brake Drum and Wheel
Once the new brake shoes are in place, reinstall the brake drum over the shoes. Ensure it turns freely without rubbing against the shoes. Next, place the wheel back onto the hub, hand-tighten the lug nuts, and lower the vehicle back to the ground. Once the vehicle is secure, fully tighten the lug nuts in a crisscross pattern to ensure even distribution of pressure.
7. Test the Brakes
After completing the installation, it is crucial to test the brakes before taking the vehicle on the road. Press the brake pedal several times to ensure proper seating of the brake shoes against the drum. Test drive the vehicle at low speeds, checking for any unusual noises or vibrations that could indicate improper installation. Ensure the brakes engage smoothly and effectively.
In summary, regular maintenance of drum brakes involves these critical seven steps. By understanding each step and executing it properly, vehicle owners can help ensure their drum brakes remain in excellent working condition, contributing to overall vehicle safety and performance. Remember, when in doubt, it’s always best to consult a professional mechanic for assistance.
-
What Are Drum BrakesNewsJul.07,2025
-
Understanding Brake Drum MaterialNewsJul.07,2025
-
Semi-Trailer Brake Drum: A Key Component for Extreme Loads and Long-Distance TransportNewsJul.07,2025
-
Drum Brake Pads for SaleNewsJul.07,2025
-
Brake Drums for SaleNewsJul.07,2025
-
Brake Drum ManufacturerNewsJul.07,2025
-
Aluminum Brake Drums: The Future of High-Performance CarsNewsJul.07,2025
