-
 Afrikaans
 -
 Albanian
 -
 Amharic
 -
 Arabic
 -
 Armenian
 -
 Azerbaijani
 -
 Basque
 -
 Belarusian
 -
 Bengali
 -
 Bosnian
 -
 Bulgarian
 -
 Catalan
 -
 Cebuano
 -
 Corsican
 -
 Croatian
 -
 Czech
Czech -
 Danish
 -
 Dutch
Dutch -
 English
 -
 Esperanto
 -
 Estonian
 -
 Finnish
 -
 French
 -
 Frisian
 -
 Galician
 -
 Georgian
 -
 German
 -
 Greek
Greek -
 Gujarati
 -
 Haitian Creole
 -
 hausa
hausa -
 hawaiian
 -
 Hebrew
 -
 Hindi
Hindi -
 Miao
Miao -
 Hungarian
 -
 Icelandic
 -
 igbo
igbo -
 Indonesian
 -
 irish
irish -
 Italian
 -
 Japanese
 -
 Javanese
 -
 Kannada
 -
 kazakh
 -
 Khmer
Khmer -
 Rwandese
 -
 Korean
 -
 Kurdish
 -
 Kyrgyz
 -
 Lao
Lao -
 Latin
Latin -
 Latvian
 -
 Lithuanian
 -
 Luxembourgish
 -
 Macedonian
 -
 Malgashi
 -
 Malay
Malay -
 Malayalam
 -
 Maltese
 -
 Maori
Maori -
 Marathi
 -
 Mongolian
 -
 Myanmar
 -
 Nepali
 -
 Norwegian
 -
 Norwegian
 -
 Occitan
 -
 Pashto
 -
 Persian
 -
 Polish
 -
 Portuguese
 -
 Punjabi
 -
 Romanian
 -
 Russian
 -
 Samoan
 -
 Scottish Gaelic
 -
 Serbian
 -
 Sesotho
 -
 Shona
Shona -
 Sindhi
 -
 Sinhala
 -
 Slovak
 -
 Slovenian
 -
 Somali
 -
 Spanish
 -
 Sundanese
 -
 Swahili
 -
 Swedish
 -
 Tagalog
 -
 Tajik
Tajik -
 Tamil
Tamil -
 Tatar
Tatar -
 Telugu
 -
 Thai
Thai -
 Turkish
 -
 Turkmen
 -
 Ukrainian
 -
 Urdu
Urdu -
 Uighur
 -
 Uzbek
Uzbek -
 Vietnamese
 -
 Welsh
Welsh -
 Bantu
Bantu -
 Yiddish
 -
 Yoruba
 -
 Zulu
Zulu
list the seven major steps for drum brake service
Seven Major Steps for Drum Brake Service
Drum brake systems are a crucial part of a vehicle's braking mechanism, providing reliable stopping power. Over time, these systems may require service to ensure optimal performance and safety. Here are the seven major steps for effective drum brake service.
1. Preparation and Safety Measures Before starting any maintenance work, it's essential to ensure your safety and the safety of others. Park the vehicle on a flat surface, engage the parking brake, and wear appropriate personal protective equipment, such as gloves and safety glasses. Also, make sure to disconnect the battery to prevent any electrical mishaps during the service.
2. Wheel Removal To access the drum brakes, the wheels must be removed first. Loosen the lug nuts before lifting the vehicle with a jack, and then fully remove the lug nuts and the wheel. This provides clear access to the brake drum.
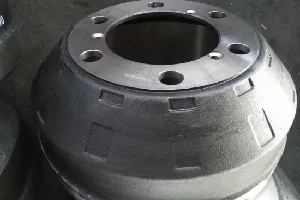
3. Drum Inspection Once the wheel is removed, inspect the brake drum for any signs of wear or damage. Check for scoring, cracking, or excessive heat marks on the drum's surface. If the drum appears severely worn, it may need to be resurfaced or replaced.
list the seven major steps for drum brake service

4. Removing the Drum To remove the brake drum, locate and remove the retaining screws, if present. Pull the drum off the hub; if it’s stuck due to corrosion or wear, gently tap it with a mallet to loosen it. Be cautious not to damage any surrounding components.
5. Inspection of Brake Components With the drum removed, examine the brakes’ internal components—the brake shoes, springs, and hardware. Look for any signs of wear, such as fraying or cracking in the brake shoes. Ensure all springs and hardware are intact and functioning correctly. Replace any worn components to restore the brake system's efficiency.
6. Cleaning Clean the interior of the drum and the brake assembly with brake cleaner to remove dust and debris. This helps to ensure that the new components function optimally and prevents contamination.
7. Reassembly and Adjustment After inspection and cleaning, install the new or refurbished brake components as necessary. Reattach the drum, ensuring it fits securely over the shoes and hardware. Reinstall the wheel, tighten the lug nuts, and lower the vehicle. Finally, pump the brake pedal several times to adjust the brake shoes, ensuring they contact the drum securely.
By following these seven steps, you can ensure that your drum brake system operates efficiently and safely. Regular maintenance not only prolongs the lifespan of your brakes but also enhances the overall safety of your vehicle. If you are uncertain about any step in the service process, it is wise to consult with or hire a professional mechanic to perform the work.
-
What Are Drum BrakesNewsJul.07,2025
-
Understanding Brake Drum MaterialNewsJul.07,2025
-
Semi-Trailer Brake Drum: A Key Component for Extreme Loads and Long-Distance TransportNewsJul.07,2025
-
Drum Brake Pads for SaleNewsJul.07,2025
-
Brake Drums for SaleNewsJul.07,2025
-
Brake Drum ManufacturerNewsJul.07,2025
-
Aluminum Brake Drums: The Future of High-Performance CarsNewsJul.07,2025
