-
 Afrikaans
 -
 Albanian
 -
 Amharic
 -
 Arabic
 -
 Armenian
 -
 Azerbaijani
 -
 Basque
 -
 Belarusian
 -
 Bengali
 -
 Bosnian
 -
 Bulgarian
 -
 Catalan
 -
 Cebuano
 -
 Corsican
 -
 Croatian
 -
 Czech
Czech -
 Danish
 -
 Dutch
Dutch -
 English
 -
 Esperanto
 -
 Estonian
 -
 Finnish
 -
 French
 -
 Frisian
 -
 Galician
 -
 Georgian
 -
 German
 -
 Greek
Greek -
 Gujarati
 -
 Haitian Creole
 -
 hausa
hausa -
 hawaiian
 -
 Hebrew
 -
 Hindi
Hindi -
 Miao
Miao -
 Hungarian
 -
 Icelandic
 -
 igbo
igbo -
 Indonesian
 -
 irish
irish -
 Italian
 -
 Japanese
 -
 Javanese
 -
 Kannada
 -
 kazakh
 -
 Khmer
Khmer -
 Rwandese
 -
 Korean
 -
 Kurdish
 -
 Kyrgyz
 -
 Lao
Lao -
 Latin
Latin -
 Latvian
 -
 Lithuanian
 -
 Luxembourgish
 -
 Macedonian
 -
 Malgashi
 -
 Malay
Malay -
 Malayalam
 -
 Maltese
 -
 Maori
Maori -
 Marathi
 -
 Mongolian
 -
 Myanmar
 -
 Nepali
 -
 Norwegian
 -
 Norwegian
 -
 Occitan
 -
 Pashto
 -
 Persian
 -
 Polish
 -
 Portuguese
 -
 Punjabi
 -
 Romanian
 -
 Russian
 -
 Samoan
 -
 Scottish Gaelic
 -
 Serbian
 -
 Sesotho
 -
 Shona
Shona -
 Sindhi
 -
 Sinhala
 -
 Slovak
 -
 Slovenian
 -
 Somali
 -
 Spanish
 -
 Sundanese
 -
 Swahili
 -
 Swedish
 -
 Tagalog
 -
 Tajik
Tajik -
 Tamil
Tamil -
 Tatar
Tatar -
 Telugu
 -
 Thai
Thai -
 Turkish
 -
 Turkmen
 -
 Ukrainian
 -
 Urdu
Urdu -
 Uighur
 -
 Uzbek
Uzbek -
 Vietnamese
 -
 Welsh
Welsh -
 Bantu
Bantu -
 Yiddish
 -
 Yoruba
 -
 Zulu
Zulu
Tips for Replacing Rear Drum Brakes Efficiently at Home
Rear Drum Brake Replacement A Comprehensive Guide
When it comes to vehicle maintenance, one of the critical components that should not be overlooked is the brake system. Among various types of brakes, rear drum brakes are common in many vehicles, especially in older models and some light trucks. If you notice signs of wear, such as decreased braking performance or unusual noises when braking, it may be time to replace your rear drum brakes. This article will walk you through the essentials of rear drum brake replacement.
Understanding Rear Drum Brakes
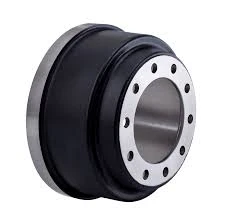
Before delving into the replacement process, it’s essential to understand how rear drum brakes work. Unlike disc brakes, which utilize pads that clamp down on a rotor, drum brakes consist of a cylindrical drum that rotates with the wheel and brake shoes that press against the inner surface of the drum to create friction and slow the vehicle. Over time, these components wear out and require replacement.
Signs That Replacement is Needed
Recognizing the signs of worn drum brakes can save you from more severe issues down the road. Common indicators include
1. Difficulty in Stopping If your vehicle takes longer to stop or the brake pedal feels soft, it’s a clear signal that your brake system needs attention. 2. Squeaking or Grinding Noises Noises during braking often indicate that the brake shoes are worn down and metal is rubbing against metal. 3. Vibration or Pulsation A rough feel when braking can suggest that the drum is warped and needs replacement. 4. Leaking Fluid Brake fluid leaks around the braking system can compromise performance and may indicate damaged lines or seals.
Tools and Materials Needed
Before starting the replacement, ensure you have the following tools
- Jack and jack stands - Lug wrench - Brake cleaner - Drum brake hardware kit (if necessary) - Replacement brake shoes - Torque wrench - Safety goggles and gloves
Step-by-Step Replacement Process
rear drum brake replacement

1. Safety First Make sure the vehicle is parked on a level surface, engage the parking brake, and wear safety gear.
2. Lift the Vehicle Use the jack to lift the rear of the vehicle and secure it with jack stands. Remove the rear wheels using the lug wrench.
3. Remove the Drum Locate the drum and inspect it for retaining screws. If present, remove them before sliding the drum off the assembly. If it’s stuck, gently tap it with a hammer to loosen it.
4. Inspect the Brake Shoes and Components Once the drum is removed, check the brake shoes for wear, and look at the springs and adjusters for damage. Take note of how everything is assembled for easier reinstallation.
5. Replace the Brake Shoes If necessary, detach the old brake shoes and install the new ones, following the reverse order of how you took the old ones off. Be sure to replace any worn hardware as well.
6. Reassemble the Brake System After installing the new shoes, carefully put the drum back on. Make sure it spins freely without any obstruction.
7. Reinstall the Wheels Place the wheels back on, tighten the lug nuts, and lower the vehicle back to the ground.
8. Testing Once everything is assembled, pump the brake pedal a few times to position the shoes properly against the drum. Conduct a test drive to ensure everything works correctly.
Conclusion
Replacing rear drum brakes is a manageable task for those with some mechanical knowledge and the right tools. Regular maintenance not only enhances the performance of your brake system but also ensures your safety on the road. If at any point you feel unsure about the process, don’t hesitate to consult a professional mechanic.
-
What Are Drum BrakesNewsJul.07,2025
-
Understanding Brake Drum MaterialNewsJul.07,2025
-
Semi-Trailer Brake Drum: A Key Component for Extreme Loads and Long-Distance TransportNewsJul.07,2025
-
Drum Brake Pads for SaleNewsJul.07,2025
-
Brake Drums for SaleNewsJul.07,2025
-
Brake Drum ManufacturerNewsJul.07,2025
-
Aluminum Brake Drums: The Future of High-Performance CarsNewsJul.07,2025
