-
 Afrikaans
 -
 Albanian
 -
 Amharic
 -
 Arabic
 -
 Armenian
 -
 Azerbaijani
 -
 Basque
 -
 Belarusian
 -
 Bengali
 -
 Bosnian
 -
 Bulgarian
 -
 Catalan
 -
 Cebuano
 -
 Corsican
 -
 Croatian
 -
 Czech
Czech -
 Danish
 -
 Dutch
Dutch -
 English
 -
 Esperanto
 -
 Estonian
 -
 Finnish
 -
 French
 -
 Frisian
 -
 Galician
 -
 Georgian
 -
 German
 -
 Greek
Greek -
 Gujarati
 -
 Haitian Creole
 -
 hausa
hausa -
 hawaiian
 -
 Hebrew
 -
 Hindi
Hindi -
 Miao
Miao -
 Hungarian
 -
 Icelandic
 -
 igbo
igbo -
 Indonesian
 -
 irish
irish -
 Italian
 -
 Japanese
 -
 Javanese
 -
 Kannada
 -
 kazakh
 -
 Khmer
Khmer -
 Rwandese
 -
 Korean
 -
 Kurdish
 -
 Kyrgyz
 -
 Lao
Lao -
 Latin
Latin -
 Latvian
 -
 Lithuanian
 -
 Luxembourgish
 -
 Macedonian
 -
 Malgashi
 -
 Malay
Malay -
 Malayalam
 -
 Maltese
 -
 Maori
Maori -
 Marathi
 -
 Mongolian
 -
 Myanmar
 -
 Nepali
 -
 Norwegian
 -
 Norwegian
 -
 Occitan
 -
 Pashto
 -
 Persian
 -
 Polish
 -
 Portuguese
 -
 Punjabi
 -
 Romanian
 -
 Russian
 -
 Samoan
 -
 Scottish Gaelic
 -
 Serbian
 -
 Sesotho
 -
 Shona
Shona -
 Sindhi
 -
 Sinhala
 -
 Slovak
 -
 Slovenian
 -
 Somali
 -
 Spanish
 -
 Sundanese
 -
 Swahili
 -
 Swedish
 -
 Tagalog
 -
 Tajik
Tajik -
 Tamil
Tamil -
 Tatar
Tatar -
 Telugu
 -
 Thai
Thai -
 Turkish
 -
 Turkmen
 -
 Ukrainian
 -
 Urdu
Urdu -
 Uighur
 -
 Uzbek
Uzbek -
 Vietnamese
 -
 Welsh
Welsh -
 Bantu
Bantu -
 Yiddish
 -
 Yoruba
 -
 Zulu
Zulu
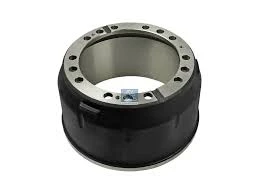
removing a brake drum
Removing a Brake Drum A Step-by-Step Guide
Brake drums are a crucial component of a vehicle's braking system, primarily found on older cars and some light trucks. Over time, these drums can wear out, warp, or become contaminated, leading to decreased braking performance. Therefore, at some point, vehicle owners may need to remove and inspect or replace their brake drums. This process might seem daunting, but with the right tools and a little patience, it can be accomplished safely and effectively. Here's a step-by-step guide on how to remove a brake drum.
Tools You'll Need
Before you start, make sure you have the following tools handy
1. Jack and jack stands 2. Lug wrench 3. Brake drum puller (if necessary) 4. Socket set or wrench 5. Screwdriver 6. Hammer 7. Safety glasses and gloves
Step 1 Safety First
Always prioritize safety when working on your vehicle. Begin by parking the vehicle on a flat surface and engaging the parking brake. Wearing safety glasses and gloves is recommended to protect your eyes and hands from debris.
Step 2 Loosen the Lug Nuts
Using a lug wrench, slightly loosen the lug nuts on the wheel covering the brake drum you wish to remove. It’s easier to do this while the wheel is still on the ground. Do not remove the lug nuts completely at this stage.
Step 3 Lift the Vehicle
Once the lug nuts are loosened, use a jack to lift the vehicle. Ensure that you place jack stands under the vehicle to secure it safely. Never rely solely on the jack, as it could fail.
Step 4 Remove the Wheel
removing a brake drum

Now that the vehicle is securely lifted, completely remove the loosened lug nuts and take off the wheel
. This will expose the brake drum.Step 5 Inspect the Drum for Retaining Screws
In some cases, a brake drum may be held in place by retaining screws. Inspect the brake drum for these screws. If you find any, use a screwdriver to remove them. Be careful not to strip the screw heads.
Step 6 Check for Dust Caps
Some brake drums have dust caps that need to be removed before the drum can be taken off. Use a flat-head screwdriver to carefully pry off the cap if it’s present.
Step 7 Remove the Brake Drum
At this point, the brake drum should come off easily. However, if it seems stuck, you might need to use a hammer gently to tap around the edges of the drum to loosen it. A brake drum puller can be used if it still doesn’t budge. Attach the puller to the drum and turn the central screw to apply even pressure until the drum gradually comes off.
Step 8 Inspect and Clean
Once the drum is off, inspect the inner surface for wear or damage. If replacing the drum is necessary, you can now do so. Clean any debris or dust from the brake shoes and other components with brake cleaner. This is an excellent opportunity to look for other components that may need attention, like brake pads or fluid leaks.
Conclusion
Removing a brake drum may require some effort, but following these steps will ensure that you do it safely and effectively. Whether you’re completing routine maintenance or addressing specific issues, understanding this process will empower you as a vehicle owner. Always remember, if you're uncertain at any point or feel uncomfortable with the process, consulting with a professional mechanic is a wise choice. Safe driving is paramount, and effective braking is essential to ensure your safety on the road.
-
What Are Drum BrakesNewsJul.07,2025
-
Understanding Brake Drum MaterialNewsJul.07,2025
-
Semi-Trailer Brake Drum: A Key Component for Extreme Loads and Long-Distance TransportNewsJul.07,2025
-
Drum Brake Pads for SaleNewsJul.07,2025
-
Brake Drums for SaleNewsJul.07,2025
-
Brake Drum ManufacturerNewsJul.07,2025
-
Aluminum Brake Drums: The Future of High-Performance CarsNewsJul.07,2025
