-
 Afrikaans
 -
 Albanian
 -
 Amharic
 -
 Arabic
 -
 Armenian
 -
 Azerbaijani
 -
 Basque
 -
 Belarusian
 -
 Bengali
 -
 Bosnian
 -
 Bulgarian
 -
 Catalan
 -
 Cebuano
 -
 Corsican
 -
 Croatian
 -
 Czech
Czech -
 Danish
 -
 Dutch
Dutch -
 English
 -
 Esperanto
 -
 Estonian
 -
 Finnish
 -
 French
 -
 Frisian
 -
 Galician
 -
 Georgian
 -
 German
 -
 Greek
Greek -
 Gujarati
 -
 Haitian Creole
 -
 hausa
hausa -
 hawaiian
 -
 Hebrew
 -
 Hindi
Hindi -
 Miao
Miao -
 Hungarian
 -
 Icelandic
 -
 igbo
igbo -
 Indonesian
 -
 irish
irish -
 Italian
 -
 Japanese
 -
 Javanese
 -
 Kannada
 -
 kazakh
 -
 Khmer
Khmer -
 Rwandese
 -
 Korean
 -
 Kurdish
 -
 Kyrgyz
 -
 Lao
Lao -
 Latin
Latin -
 Latvian
 -
 Lithuanian
 -
 Luxembourgish
 -
 Macedonian
 -
 Malgashi
 -
 Malay
Malay -
 Malayalam
 -
 Maltese
 -
 Maori
Maori -
 Marathi
 -
 Mongolian
 -
 Myanmar
 -
 Nepali
 -
 Norwegian
 -
 Norwegian
 -
 Occitan
 -
 Pashto
 -
 Persian
 -
 Polish
 -
 Portuguese
 -
 Punjabi
 -
 Romanian
 -
 Russian
 -
 Samoan
 -
 Scottish Gaelic
 -
 Serbian
 -
 Sesotho
 -
 Shona
Shona -
 Sindhi
 -
 Sinhala
 -
 Slovak
 -
 Slovenian
 -
 Somali
 -
 Spanish
 -
 Sundanese
 -
 Swahili
 -
 Swedish
 -
 Tagalog
 -
 Tajik
Tajik -
 Tamil
Tamil -
 Tatar
Tatar -
 Telugu
 -
 Thai
Thai -
 Turkish
 -
 Turkmen
 -
 Ukrainian
 -
 Urdu
Urdu -
 Uighur
 -
 Uzbek
Uzbek -
 Vietnamese
 -
 Welsh
Welsh -
 Bantu
Bantu -
 Yiddish
 -
 Yoruba
 -
 Zulu
Zulu
removing a brake drum
Removing a Brake Drum A Step-by-Step Guide
Removing a brake drum is an essential maintenance task that many vehicle owners may need to perform, especially if they are dealing with issues such as brake noise, reduced braking efficiency, or worn-out brake components. Understanding how to safely and effectively remove a brake drum not only helps in maintaining your vehicle but also empowers you to take charge of your own automotive care. Here’s a comprehensive guide to help you through the process of removing a brake drum.
Tools and Materials Needed
Before starting, gather the necessary tools and materials - Jack and jack stands - Lug wrench - Brake cleaner - Drum puller (if needed) - Ratchet and socket set - Screwdrivers - Protective gloves and eyewear
Safety First
Before beginning any brake system work, it is crucial to prioritize safety. Park your vehicle on a level surface and engage the parking brake. Wearing gloves and safety goggles will protect you from dust and debris during the process.
Step 1 Loosen the Lug Nuts
Using a lug wrench, slightly loosen the lug nuts on the wheel corresponding to the brake drum you want to remove. Remember, it’s best to do this while the vehicle is still on the ground to prevent the wheel from spinning freely.
Step 2 Lift the Vehicle
Using a jack, lift the vehicle from the appropriate jacking point. Once elevated, securely place jack stands under the vehicle to ensure stability and safety. After securing the vehicle, fully remove the lug nuts and take off the wheel.
Step 3 Inspect the Brake Drum
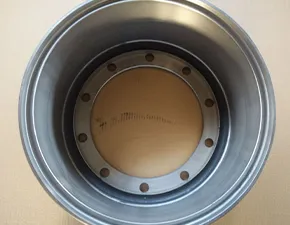
removing a brake drum

With the wheel removed, take a moment to inspect the brake drum visually. Look for signs of wear, scoring, cracks, or rust. This inspection can help you determine whether the drum needs to be resurfaced or replaced.
Step 4 Locate the Retaining Hardware
Brake drums are typically held in place by either screws or retaining clips. Locate these fasteners, which are usually positioned at the wheel hub. If you encounter screws, use the appropriate screwdriver to remove them; if clips are present, carefully unclip them.
Step 5 Remove the Brake Drum
Once any retaining hardware is removed, you should be able to pull the brake drum off the wheel hub. If the drum seems stuck, it could be due to rust or the brake shoes being pressed against it. You may need to use a rubber mallet to gently tap around the circumference of the drum to free it. In some cases, a drum puller can be employed for extra leverage.
Step 6 Inspect Brake Shoes and Components
After removing the drum, inspect the brake shoes, springs, and other components for wear or damage. This is an excellent opportunity to assess whether any parts need replacement. Remember that brake shoes can wear unevenly, so it’s always wise to replace them in pairs for even braking performance.
Step 7 Clean and Prepare for Reinstallation
Before putting everything back together, clean the brake drum and other components using brake cleaner. Remove any dust and debris to ensure optimal function. If you plan to reinstall the same drum, check it thoroughly for any signs of warping or wear.
Conclusion
Removing a brake drum is a straightforward process that can save you both time and money when performed correctly. Regular maintenance of your brake system is essential for safe driving and vehicle longevity. If you are unsure at any point during the process, don’t hesitate to consult a professional mechanic to ensure your safety and the well-being of your vehicle. With this knowledge, you can tackle your brake maintenance with confidence.
-
What Are Drum BrakesNewsJul.07,2025
-
Understanding Brake Drum MaterialNewsJul.07,2025
-
Semi-Trailer Brake Drum: A Key Component for Extreme Loads and Long-Distance TransportNewsJul.07,2025
-
Drum Brake Pads for SaleNewsJul.07,2025
-
Brake Drums for SaleNewsJul.07,2025
-
Brake Drum ManufacturerNewsJul.07,2025
-
Aluminum Brake Drums: The Future of High-Performance CarsNewsJul.07,2025
