-
 Afrikaans
 -
 Albanian
 -
 Amharic
 -
 Arabic
 -
 Armenian
 -
 Azerbaijani
 -
 Basque
 -
 Belarusian
 -
 Bengali
 -
 Bosnian
 -
 Bulgarian
 -
 Catalan
 -
 Cebuano
 -
 Corsican
 -
 Croatian
 -
 Czech
Czech -
 Danish
 -
 Dutch
Dutch -
 English
 -
 Esperanto
 -
 Estonian
 -
 Finnish
 -
 French
 -
 Frisian
 -
 Galician
 -
 Georgian
 -
 German
 -
 Greek
Greek -
 Gujarati
 -
 Haitian Creole
 -
 hausa
hausa -
 hawaiian
 -
 Hebrew
 -
 Hindi
Hindi -
 Miao
Miao -
 Hungarian
 -
 Icelandic
 -
 igbo
igbo -
 Indonesian
 -
 irish
irish -
 Italian
 -
 Japanese
 -
 Javanese
 -
 Kannada
 -
 kazakh
 -
 Khmer
Khmer -
 Rwandese
 -
 Korean
 -
 Kurdish
 -
 Kyrgyz
 -
 Lao
Lao -
 Latin
Latin -
 Latvian
 -
 Lithuanian
 -
 Luxembourgish
 -
 Macedonian
 -
 Malgashi
 -
 Malay
Malay -
 Malayalam
 -
 Maltese
 -
 Maori
Maori -
 Marathi
 -
 Mongolian
 -
 Myanmar
 -
 Nepali
 -
 Norwegian
 -
 Norwegian
 -
 Occitan
 -
 Pashto
 -
 Persian
 -
 Polish
 -
 Portuguese
 -
 Punjabi
 -
 Romanian
 -
 Russian
 -
 Samoan
 -
 Scottish Gaelic
 -
 Serbian
 -
 Sesotho
 -
 Shona
Shona -
 Sindhi
 -
 Sinhala
 -
 Slovak
 -
 Slovenian
 -
 Somali
 -
 Spanish
 -
 Sundanese
 -
 Swahili
 -
 Swedish
 -
 Tagalog
 -
 Tajik
Tajik -
 Tamil
Tamil -
 Tatar
Tatar -
 Telugu
 -
 Thai
Thai -
 Turkish
 -
 Turkmen
 -
 Ukrainian
 -
 Urdu
Urdu -
 Uighur
 -
 Uzbek
Uzbek -
 Vietnamese
 -
 Welsh
Welsh -
 Bantu
Bantu -
 Yiddish
 -
 Yoruba
 -
 Zulu
Zulu
removing stuck drum brakes
How to Remove Stuck Drum Brakes
Removing stuck drum brakes can be a challenging task, but with the right tools and techniques, you can do it efficiently and safely. This article will guide you through the steps to remove stuck drum brakes, emphasizing safety precautions and practical tips to make the process smoother.
Understanding Drum Brakes
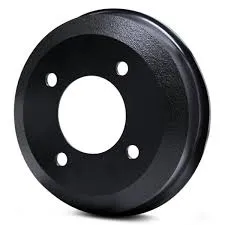
Drum brakes work by using friction to slow down or stop the vehicle. They consist of a brake drum, which is a cylindrical component that houses the brake shoes. When you press the brake pedal, the brake shoes expand against the inside of the drum, creating friction. Over time, various factors such as corrosion, wear and tear, or brake dust accumulation can cause the drum to become stuck.
Safety Precautions
Before attempting to remove the drum brakes, ensure that you take the necessary safety precautions
1. Wear Safety Gear Always wear safety goggles and gloves to protect yourself from debris and sharp edges. 2. Park Safely Ensure that the vehicle is parked on a level surface to prevent it from rolling. Engage the parking brake. 3. Use Wheel Chocks Place wheel chocks around the tires that will remain on the ground to provide extra stability.
Tools Required
Gather the necessary tools before you begin the removal process. Typically, you will need
- A jack and jack stands - A lug wrench - Brake drum puller (if required) - A hammer - Penetrating oil - A flashlight - A pry bar (optional)
removing stuck drum brakes

Step-by-Step Guide
1. Lift the Vehicle Using the jack, lift the vehicle and secure it with jack stands. Make sure it is stable before working underneath it.
2. Remove the Wheel Remove the lug nuts using the lug wrench and take off the wheel to expose the drum.
3. Inspect the Drum Check for any visible rust, dirt, or damage. If the drum is rusted, applying penetrating oil can help to loosen it.
4. Remove the Brake Drum - If the drum is stuck, gently tap around the edges with a hammer to loosen it. Be careful not to damage the drum. - If it still doesn't budge, you can use a brake drum puller. Attach the puller to the drum and tighten it slowly. The pressure will help to pop the drum off.
5. Check the Brake Components Once the drum is removed, inspect the brake shoes, springs, and other components for wear. This is the perfect time to clean or replace any parts that are damaged or worn out.
6. Reassembly When you’re done with your inspection or repairs, reassemble the components in the reverse order. Ensure everything is tightened securely.
7. Test Before Driving After reassembling, it’s crucial to test the brakes in a safe area. Ensure proper functionality before hitting the road.
Conclusion
Removing stuck drum brakes may take some time and effort, but with the right approach, you can accomplish it successfully. Remember to prioritize safety and double-check your work during reassembly. If you encounter significant difficulties or are uncertain at any point, don’t hesitate to consult a professional mechanic for assistance. Maintaining your brakes is essential for safe driving, so regular inspection and service are key.
-
What Are Drum BrakesNewsJul.07,2025
-
Understanding Brake Drum MaterialNewsJul.07,2025
-
Semi-Trailer Brake Drum: A Key Component for Extreme Loads and Long-Distance TransportNewsJul.07,2025
-
Drum Brake Pads for SaleNewsJul.07,2025
-
Brake Drums for SaleNewsJul.07,2025
-
Brake Drum ManufacturerNewsJul.07,2025
-
Aluminum Brake Drums: The Future of High-Performance CarsNewsJul.07,2025
