-
 Afrikaans
 -
 Albanian
 -
 Amharic
 -
 Arabic
 -
 Armenian
 -
 Azerbaijani
 -
 Basque
 -
 Belarusian
 -
 Bengali
 -
 Bosnian
 -
 Bulgarian
 -
 Catalan
 -
 Cebuano
 -
 Corsican
 -
 Croatian
 -
 Czech
Czech -
 Danish
 -
 Dutch
Dutch -
 anglisht
 -
 Esperanto
 -
 Estonian
 -
 Finnish
 -
 French
 -
 Frisian
 -
 Galician
 -
 Georgian
 -
 German
 -
 Greek
Greek -
 Gujarati
 -
 Haitian Creole
 -
 hausa
hausa -
 hawaiian
 -
 Hebrew
 -
 Hindi
Hindi -
 Miao
Miao -
 Hungarian
 -
 Icelandic
 -
 igbo
igbo -
 Indonesian
 -
 irish
irish -
 Italian
 -
 Japanese
 -
 Javanese
 -
 Kannada
 -
 kazakh
 -
 Khmer
Khmer -
 Rwandese
 -
 Korean
 -
 Kurdish
 -
 Kyrgyz
 -
 Lao
Lao -
 Latin
Latin -
 Latvian
 -
 Lithuanian
 -
 Luxembourgish
 -
 Macedonian
 -
 Malgashi
 -
 Malay
Malay -
 Malayalam
 -
 Maltese
 -
 Maori
Maori -
 Marathi
 -
 Mongolian
 -
 Myanmar
 -
 Nepali
 -
 Norwegian
 -
 Norwegian
 -
 Occitan
 -
 Pashto
 -
 Persian
 -
 Polish
 -
 Portuguese
 -
 Punjabi
 -
 Romanian
 -
 Russian
 -
 Samoan
 -
 Scottish Gaelic
 -
 Serbian
 -
 Sesotho
 -
 Shona
Shona -
 Sindhi
 -
 Sinhala
 -
 Slovak
 -
 Slovenian
 -
 Somali
 -
 Spanish
 -
 Sundanese
 -
 Swahili
 -
 Swedish
 -
 Tagalog
 -
 Tajik
Tajik -
 Tamil
Tamil -
 Tatar
Tatar -
 Telugu
 -
 Thai
Thai -
 Turkish
 -
 Turkmen
 -
 Ukrainian
 -
 Urdu
Urdu -
 Uighur
 -
 Uzbek
Uzbek -
 Vietnamese
 -
 Welsh
Welsh -
 Bantu
Bantu -
 Yiddish
 -
 Yoruba
 -
 Zulu
Zulu
how to remove drum brake hub
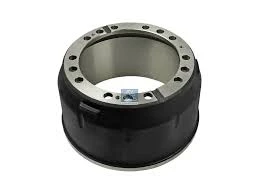
How to Remove a Drum Brake Hub A Step-by-Step Guide
Removing a drum brake hub may seem like a daunting task, but with the right tools and guidance, it can be accomplished effectively. Whether you're performing routine maintenance or replacing worn-out components, this guide will walk you through the process step by step.
Tools and Materials Needed
Before starting, gather the necessary tools and materials. You will need
- Jack and jack stands - Lug wrench - Hammer - Brake cleaner - Screwdriver (flathead and Phillips) - Socket set - Torque wrench - Replacement parts (if applicable)
Step 1 Prepare the Vehicle
First, park the vehicle on a flat surface and engage the parking brake. Loosen the lug nuts on the wheel for the hub you wish to remove, but don’t take them off completely.
Step 2 Lift the Vehicle
Using the jack, lift the vehicle until the wheel is off the ground. Secure the vehicle with jack stands to ensure safety. Once stable, completely remove the lug nuts and take off the wheel.
Step 3 Inspect the Drum Brake Assembly
Before removing the drum, inspect the brake assembly for any visible damage. Look for signs of wear on the brake shoes, springs, and other components. If replacement is necessary, ensure you have the right parts ready.
how to remove drum brake hub

Step 4 Remove the Drum
To remove the drum, locate the retaining screws or bolts holding it in place. If present, remove these using a socket or screwdriver. If the drum appears stuck, gently tap around the edges with a hammer to break any rust or debris holding it in place. Be cautious not to damage the drum’s surface.
In some cases, the backing plate may have an adjustment slot. You can access this slot to adjust the brake shoes for easier removal of the drum.
Step 5 Once Removed, Inspect the Hub
With the brake drum removed, you will now see the hub itself. Inspect the hub for any signs of damage, such as cracks or excessive wear. If you are replacing the hub, follow the manufacturer’s instructions for proper removal and installation.
Step 6 Reassemble
After completing your maintenance or replacement, it's time to reassemble. Begin by cleaning the drum and hub area with brake cleaner. Then, place the drum back on, secure it with screws or bolts, and reattach the wheel.
Step 7 Lower the Vehicle
Once everything is securely in place, lower the vehicle from the jack stands using the jack. Tighten the lug nuts in a crisscross pattern to ensure even pressure.
Conclusion
Removing a drum brake hub is a manageable task that can save you time and money. By following these steps carefully, you can efficiently complete the job and ensure your vehicle's brakes are in top condition. Always remember to consult your vehicle’s service manual for specific instructions and torque specifications.
-
What Are Drum BrakesLajmeJul.07,2025
-
Understanding Brake Drum MaterialLajmeJul.07,2025
-
Semi-Trailer Brake Drum: A Key Component for Extreme Loads and Long-Distance TransportLajmeJul.07,2025
-
Drum Brake Pads for SaleLajmeJul.07,2025
-
Brake Drums for SaleLajmeJul.07,2025
-
Brake Drum ManufacturerLajmeJul.07,2025
-
Aluminum Brake Drums: The Future of High-Performance CarsLajmeJul.07,2025
